Deeplearning.ai’daki “Introduction to On-Device AI” kursunun Türkçe çevirisidir.

Introduction
A basic smartphone could have 10 to 30 teraflops of computing power. We'll learn how to build AI applications that operate on devices. These apps are also compatible with cameras, robotics, and other devices. Despite the operating system and hardware requirements, many of these devices have comparable features. Knowing your hardware can help you run faster. There are 7 billion smartphones in the globe, with more than 300 different models. Quantization can also result in four times faster and four times smaller models.
We'll start by learning how to implement an on-device model that reduces latency while improving privacy and efficiency. We will deploy a model with a few lines of code to perform real-time segmentation of your camera feed. During this course, we will learn four fundamental principles. Capturing your model as a graph that can be moved and run on a device. The process of preparing that graph for a given device. The hardware acceleration of that model allows it to execute efficiently on-device, validating its numerical correctness. You will learn how to quantize a model in order to boost speed by roughly four times while also lowering the model's footprint. Finally, we'll incorporate this into an Android app that you can play around with.
Why On-device is Popular?
On-device AI. Fun fact: When you take a photo with your smartphone, over 20 AI models run in a few hundred milliseconds. The total economic impact of industrial IoT devices is expected to be around $3 trillion. Every time you drive a car with advanced driver assistance, you are relying totally on on-device AI. On-device AI is ubiquitous.
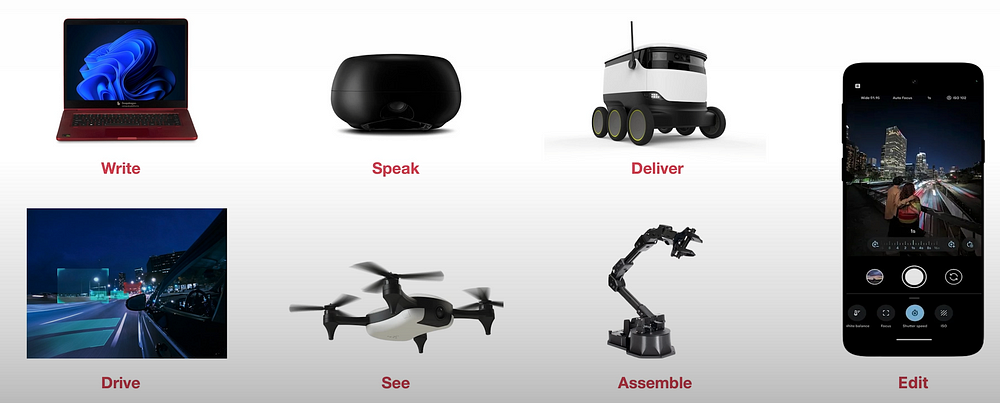
Audio and speech processing includes text-to-speech, speech recognition, machine translation, and noise removal.
Images and video: Photo classification, QR code identification, and virtual background segmentation.
Sensors include keyboards, physical activity sensing, and digital handwriting recognition.
Why would you run your model on-device?
- Cost Effective: Lowers recurrent costs by reducing reliance on cloud computing resources.
- Efficient: Increased processing speed and power efficiency by utilizing local compute power.
- Private: Stores data on the device, improving security and protecting user privacy.
- Personalized: Enables ongoing model customisation without requiring external data transfer or updates.
We will go over a new method for deploying models on-device that makes it really simple to take a model trained in the cloud and have it work on the device in around five minutes.
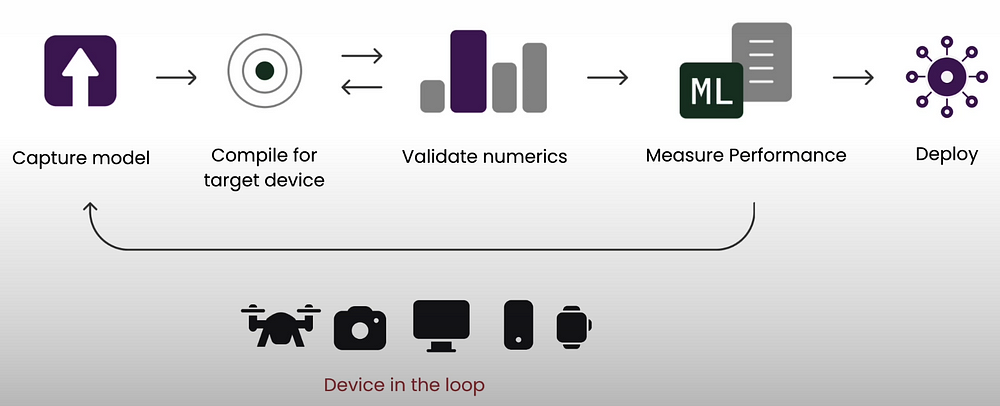
First, convert the model into a computation graph and build it for the target device. Then, validate the model's numericals on the device to which you want to deploy it, and finally, measure its performance. You will repeat these steps for each device before deploying the artifact and integrating it into your application. We will use Qualcomm's AI Hub to automate all four of these tasks.
On-device AI is also useful for generative AI applications including live translation, transcription, picture portrait production, AI editing, semantic search, text summarization, virtual assistants, writing aid, and image generation.
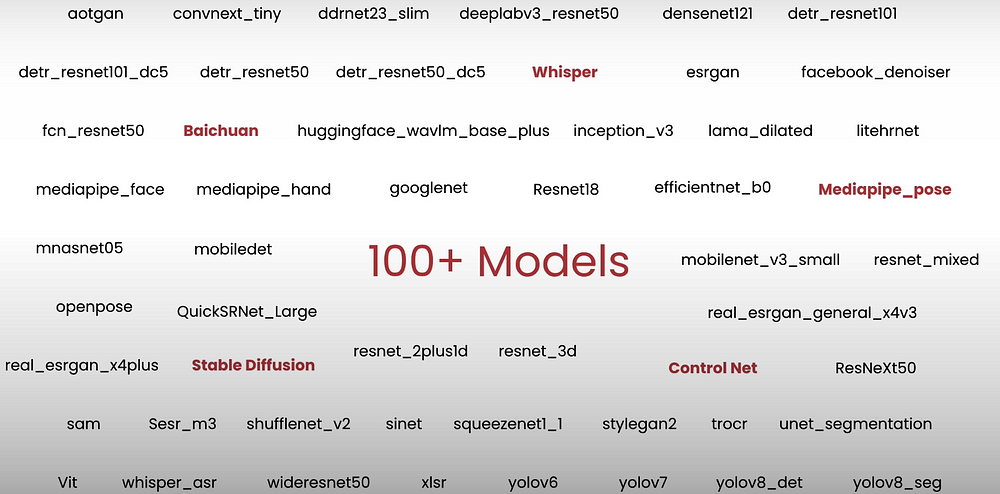
There are over 100 AI models that are simple to install on-device today.
Deploying Segmentation Models On-Device
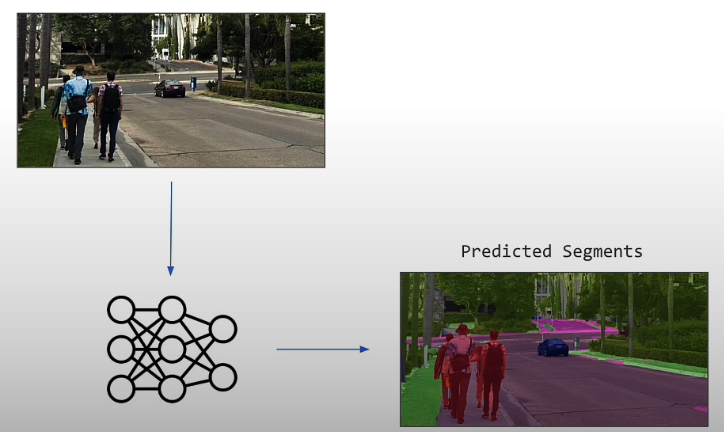
Let's run a real-time image segmentation model on-device.
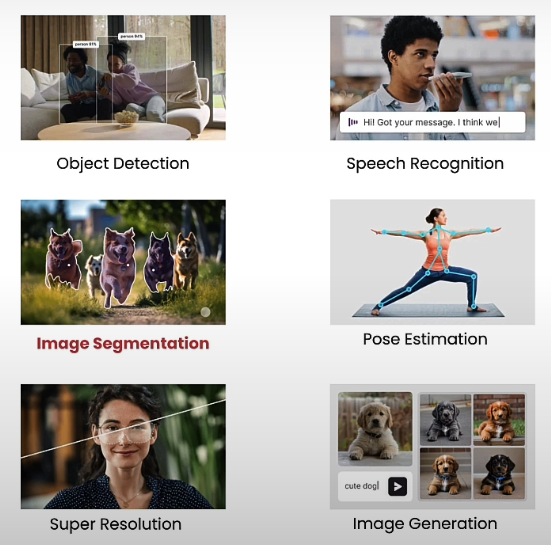
You can detect items in an image, recognize and transcribe voice, estimate a human's position, improve image resolution, and create images from text. To identify and analyze items in an image, we will utilize image segmentation.
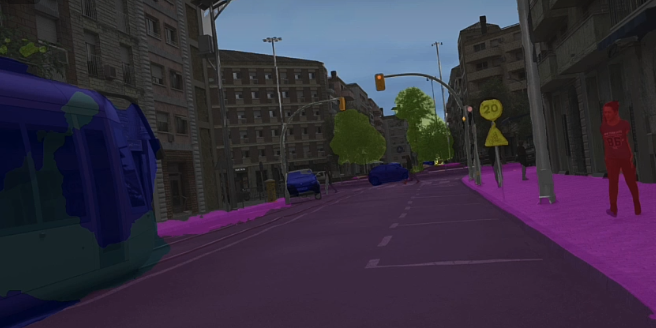
Semantic segmentation refers to class segmentation. Instance segmentation is based on individual categories. For example, in the figure below, people can be segmented out, but instance segmentation requires segmenting each persons differently.
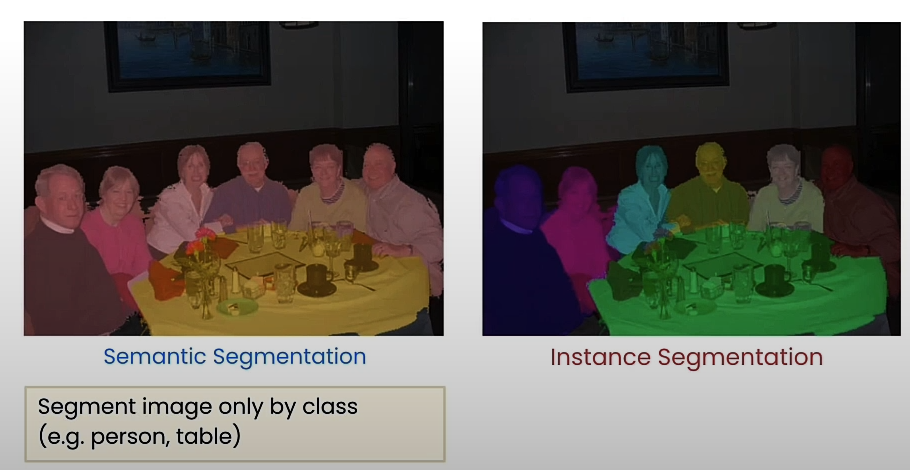
Image segmentation is used to improve image quality in self-driving cars, online meeting applications with blurred backgrounds, drone landscape mapping for agriculture and industrial apps, and mobile phone camera programs.
Semantic segmentation is performed using a variety of models. Here are the four most popular ones.
- ResNet (Residual Network): Uses residual connections to train incredibly deep networks by allowing gradients to pass through layers without decreasing.
- HRNet (High-Resolution Network): Maintains high-resolution representations across the network, allowing it to capture tiny details for precise segmentation.
- FANet (Feature Agglomeration Network): Concentrates on aggregating features from various scales, improving the model's capacity to detect finer details.
- DDRNet (Dual Dynamic Resolution Network): Uses dual-path designs to balance efficiency and accuracy, enabling real-time semantic segmentation.
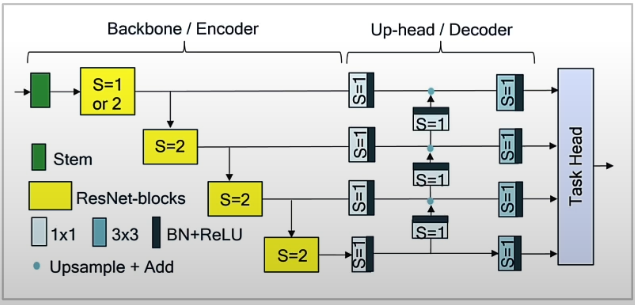
In this lesson, we'll look at FFNET (Fuss Free Network), a basic encoder-decoder architecture with a ResNet-like backbone and a small multi-scale head. FFNET performs on par with or better than complicated semantic segmentation designs like HRNet, FANet, and DDRNet. FFNET is computationally efficient, making it suitable for on-device deployments.
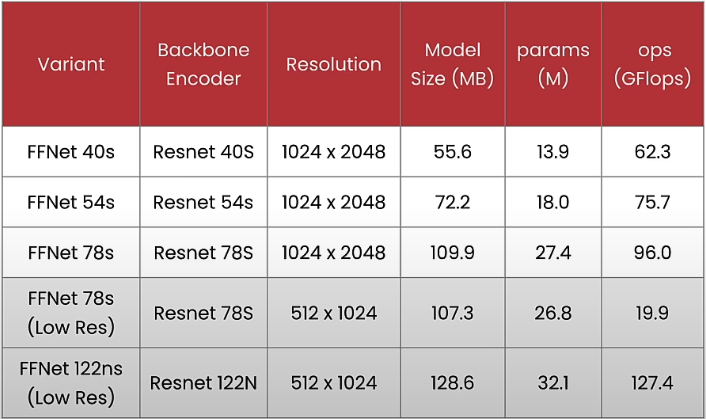
These models perform at high resolution and range in size from 55MB to 100MB, with 13 and 27 million parameters, and require approximately 62 to 96 gigaflops of computing to execute on the device. There are low-resolution options ranging in size from 100 to 150MB, with 26 to 32 million parameters. Lower resolution requires fewer operations and gigaflops.
from qai_hub_models.models.ffnet_40s import Model
from torchinfo import summary
# Load from pre-trained weights
model = Model.from_pretrained()
input_shape = (1, 3, 1024, 2048)
stats = summary(model,
  input_size=input_shape,
  col_names=["num_params", "mult_adds"]
)
print(stats)
# High resolution variants
from qai_hub_models.models.ffnet_40s import Model
#from qai_hub_models.models.ffnet_54s import Model
#from qai_hub_models.models.ffnet_78s import Model

# Low resolution variants
low_res_input_shape = (1, 3, 512, 1024)
#from qai_hub_models.models.ffnet_78s_lowres import Model
#from qai_hub_models.models.ffnet_122ns_lowres import Model

model = Model.from_pretrained()
stats = summary(model,
  input_size=input_shape, # use low_res_input_shape for low_res models
  col_names=["num_params", "mult_adds"]
)
print(stats)
import qai_hub
from utils import get_ai_hub_api_token
ai_hub_api_token = get_ai_hub_api_token()

!qai-hub configure --api_token $ai_hub_api_token
%run -m qai_hub_models.models.ffnet_40s.demo
devices = [
    "Samsung Galaxy S22 Ultra 5G",
    "Samsung Galaxy S22 5G",
    "Samsung Galaxy S22+ 5G",
    "Samsung Galaxy Tab S8",
    "Xiaomi 12",
    "Xiaomi 12 Pro",
    "Samsung Galaxy S22 5G",
    "Samsung Galaxy S23",
    "Samsung Galaxy S23+",
    "Samsung Galaxy S23 Ultra",
    "Samsung Galaxy S24",
    "Samsung Galaxy S24 Ultra",
    "Samsung Galaxy S24+",
]

import random
selected_device = random.choice(devices)
print(selected_device)
%run -m qai_hub_models.models.ffnet_40s.export -- --device "$selected_device"
%run -m qai_hub_models.models.ffnet_40s.demo -- --device "$selected_device" --on-device
Check the below URLs for each job:
The "%run -m qai_hub_models.models.ffnet_40s.export — — device "Samsung Galaxy S23"" command converts the model from Pytorch and compiles it for the Samsung Galaxy S23. Once the compilation is finished, an actual physical Samsung Galaxy S23 is created in the cloud.
Preparing For On-device Deployment
We'll cover four fundamental aspects for on-device deployment. The first focuses on neural network graph capture, which records the computation that you are connecting to the device. The second step is to compile the code on the device. The final step is using hardware to accelerate the models on the device. The final point is the significance of checking on-device numerical correctness.
- Adım: PyTorch Trace ile grafik yakalandı.
- Adım: Cihaz için derlendi.
- Adım: NPU’da çalıştırılmak üzere profil oluşturuldu.
- Adım: Cihaz üzerindeki doğruluk doğrulandı.
The following Pytorch code component can be expressed with a graph: graph capture.
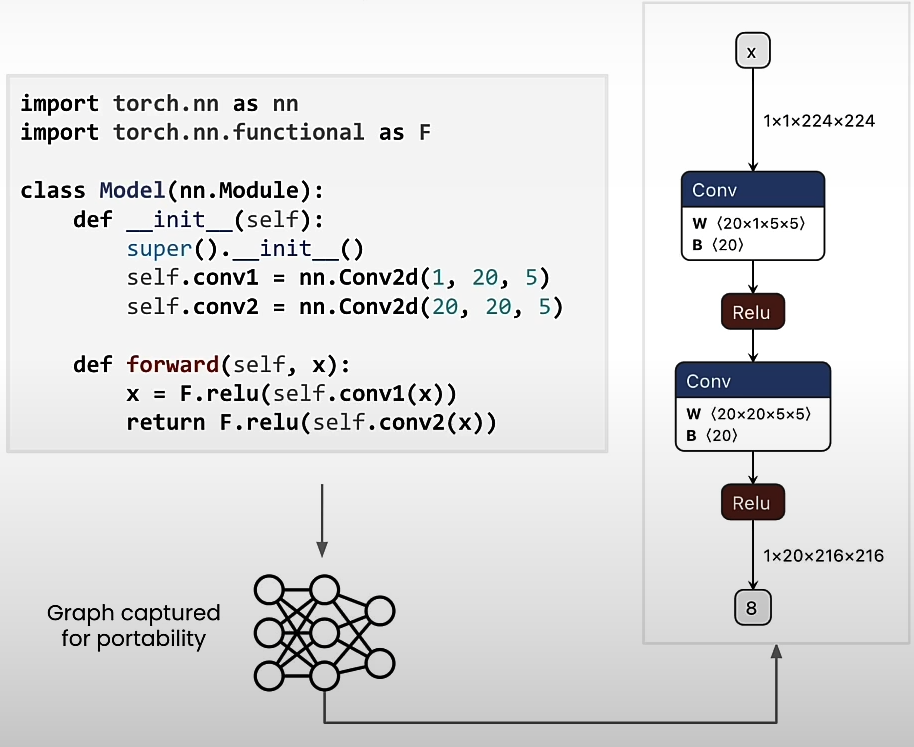
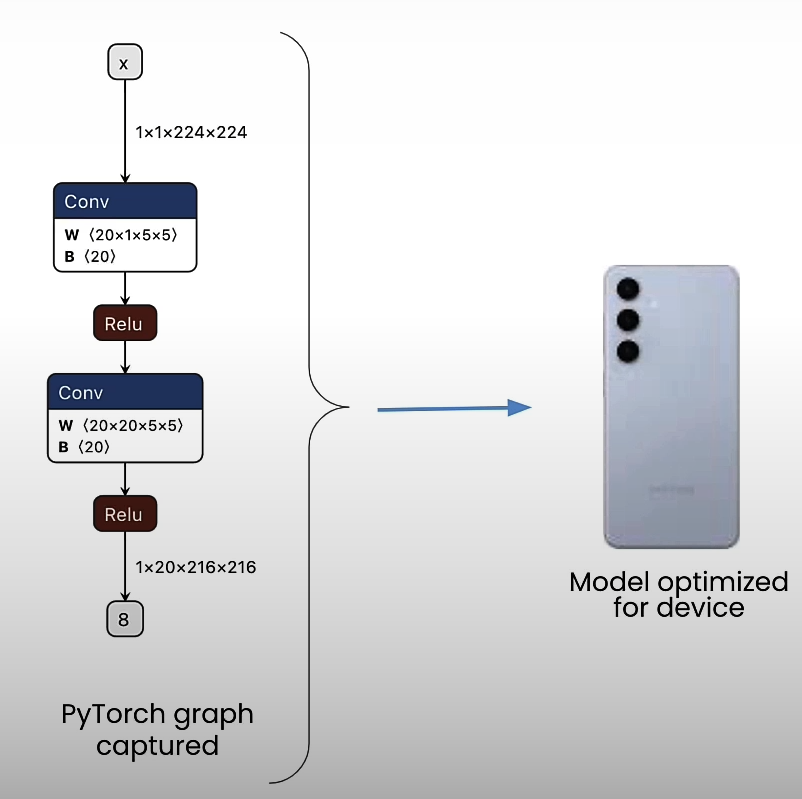
After creating the graph representation, the model is constructed particularly for device features, resulting in device optimization.
TensorFlow Lite
Optimized for mobile, especially:
from qai_hub_models.models.ffnet_40s import Model as FFNet_40s

# Load from pre-trained weights
ffnet_40s = FFNet_40s.from_pretrained()

import torch
input_shape = (1, 3, 1024, 2048)
example_inputs = torch.rand(input_shape)

traced_model = torch.jit.trace(ffnet_40s, example_inputs)

traced_model

import qai_hub
import qai_hub_models

from utils import get_ai_hub_api_token
ai_hub_api_token = get_ai_hub_api_token()

!qai-hub configure --api_token $ai_hub_api_token

for device in qai_hub.get_devices():
    print(device.name)

devices = [
    "Samsung Galaxy S22 Ultra 5G",
    "Samsung Galaxy S22 5G",
    "Samsung Galaxy S22+ 5G",
    "Samsung Galaxy Tab S8",
    "Xiaomi 12",
    "Xiaomi 12 Pro",
    "Samsung Galaxy S22 5G",
    "Samsung Galaxy S23",
    "Samsung Galaxy S23+",
    "Samsung Galaxy S23 Ultra",
    "Samsung Galaxy S24",
    "Samsung Galaxy S24 Ultra",
    "Samsung Galaxy S24+",
]

import random
selected_device = random.choice(devices)
print(selected_device)

device = qai_hub.Device(selected_device)

# Compile for target device
compile_job = qai_hub.submit_compile_job(
    model=traced_model,                        # Traced PyTorch model
    input_specs={"image": input_shape},        # Input specification
    device=device,                             # Device
)

# Download and save the target model for use on-device
target_model = compile_job.get_target_model()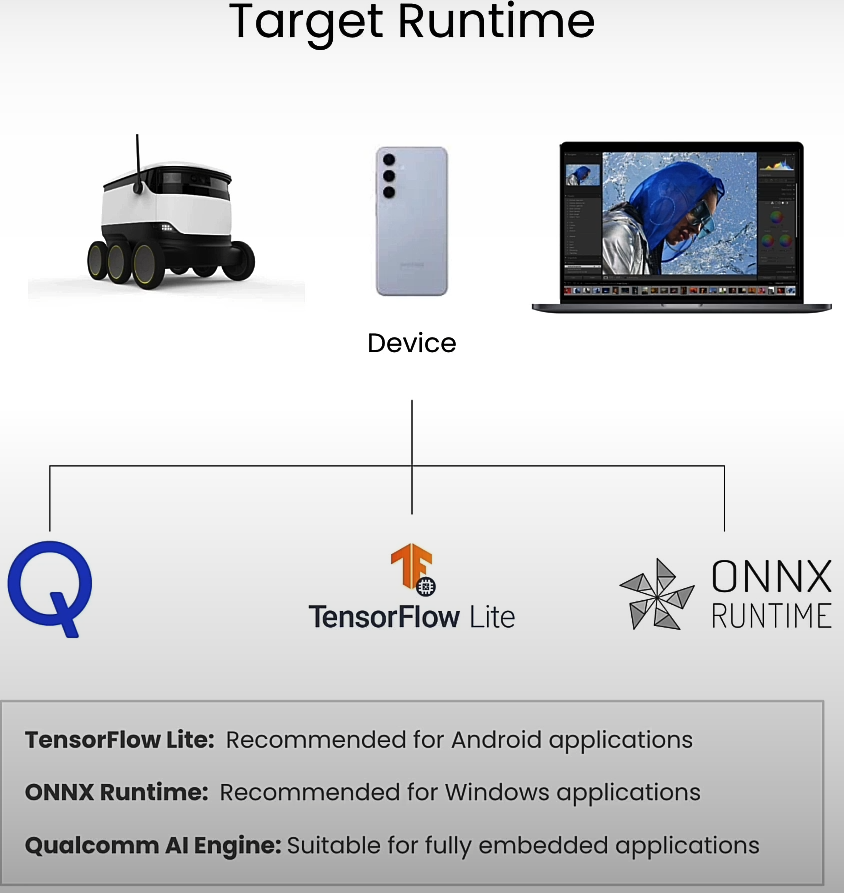
The tf lite extension is an artifact that works with the TensorFlow Lite framework. There are three common runtimes for on-device deployment. One option is TensorFlow Lite, which I recommend for Android apps. Another is the ONNX runtime, which I recommend for Windows apps, and the third is the Qualcomm AI Engine.
TensorFlow Lite is primarily built for mobile platforms and embedded devices, providing exceptionally efficient performance. It improves reaction times by minimizing computational overhead. Its deployment is rather versatile, allowing it to be used for smartphones and other IoT devices, making it incredibly portable and pervasive. It is energy efficient since it requires less power. It is also hardware-accelerated and fully compatible with the Qualcomm NPU via a process known as delegation.
Let us try alternative runtimes. Tflite, Onnx, and Qualcomm are all listed here.
compile_options="--target_runtime tflite"                  # Uses TensorFlow Lite
compile_options="--target_runtime onnx"                    # Uses ONNX runtime
compile_options="--target_runtime qnn_lib_aarch64_android" # Runs with Qualcomm AI Engine

compile_job_expt = qai_hub.submit_compile_job(
    model=traced_model,                        # Traced PyTorch model
    input_specs={"image": input_shape},        # Input specification
    device=device,                             # Device
    options=compile_options,
)

from qai_hub_models.utils.printing import print_profile_metrics_from_job

# Choose device
device = qai_hub.Device(selected_device)

# Runs a performance profile on-device
profile_job = qai_hub.submit_profile_job(
    model=target_model,                       # Compiled model
    device=device,                            # Device
)

# Print summary
profile_data = profile_job.download_profile()
print_profile_metrics_from_job(profile_job, profile_data)

profile_options="--compute_unit cpu"     # Use cpu
profile_options="--compute_unit gpu"     # Use gpu (with cpu fallback)
profile_options="--compute_unit npu"     # Use npu (with cpu fallback)

# Runs a performance profile on-device
profile_job_expt = qai_hub.submit_profile_job(
    model=target_model,                     # Compiled model
    device=device,                          # Device
    options=profile_options,
)

sample_inputs = ffnet_40s.sample_inputs()
sample_inputs

torch_inputs = torch.Tensor(sample_inputs['image'][0])
torch_outputs = ffnet_40s(torch_inputs)
torch_outputs

inference_job = qai_hub.submit_inference_job(
        model=target_model,          # Compiled model
        inputs=sample_inputs,        # Sample input
        device=device,               # Device
)

ondevice_outputs = inference_job.download_output_data()
ondevice_outputs['output_0']

from qai_hub_models.utils.printing import print_inference_metrics
print_inference_metrics(inference_job, ondevice_outputs, torch_outputs)

target_model = compile_job.get_target_model()
_ = target_model.download("FFNet_40s.tflite")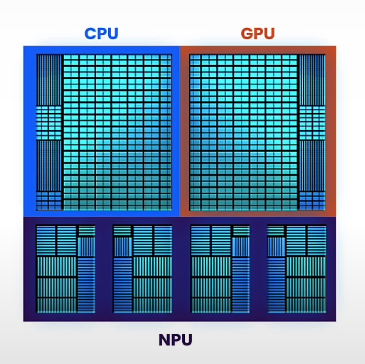
CPUs are simple to program; GPUs are parallel and high-performance, but slightly more difficult to program; and NPUs are incredibly efficient (10x) compute blocks for neural networks, but less versatile.
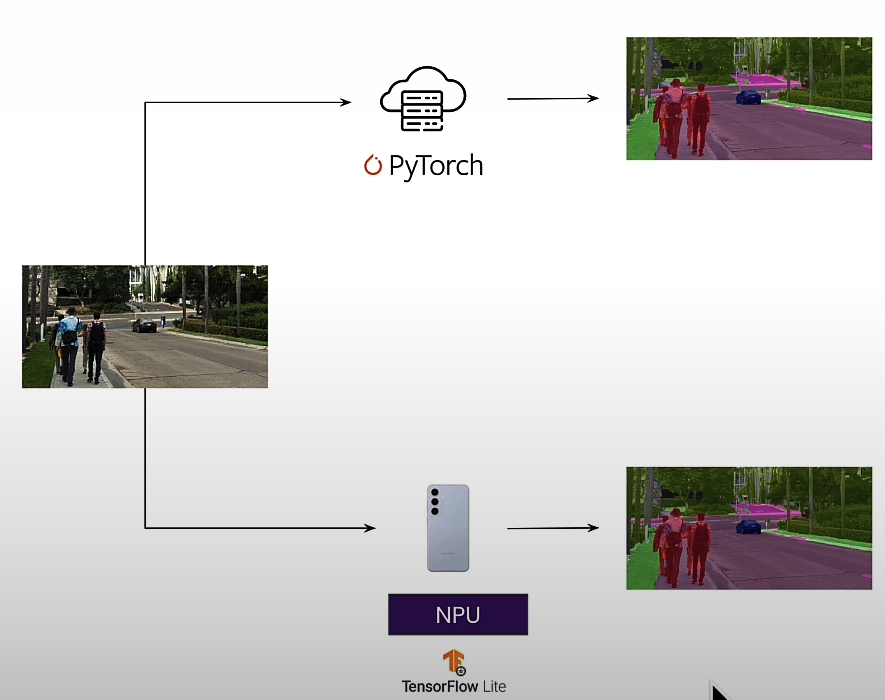
We will compare Pytorch on a notebook to NPU on a mobile device, as well as peak noise ratio measurements, which measure the difference between images.
Quantizing Models
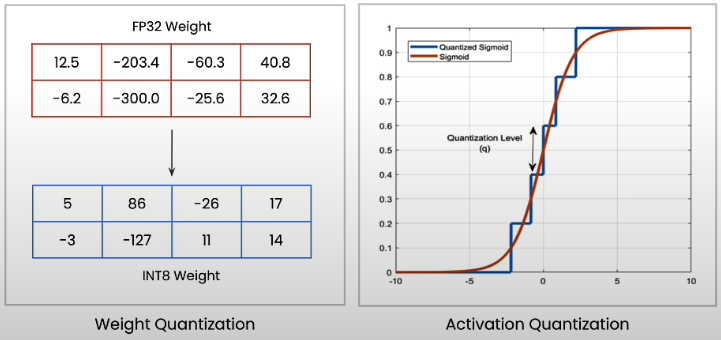
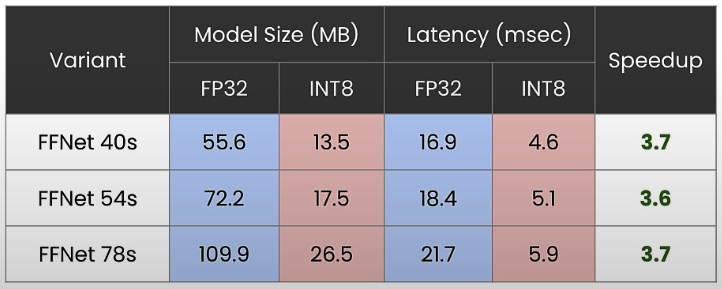
Let's quantize and reduce a model four times to achieve four times the performance. Quantizing reduces the precision of model weights. Weight quantization reduces model weight precision to improve storage and computational speed. Activation quantization uses lower precision activation values to speed up inference and reduce memory use.
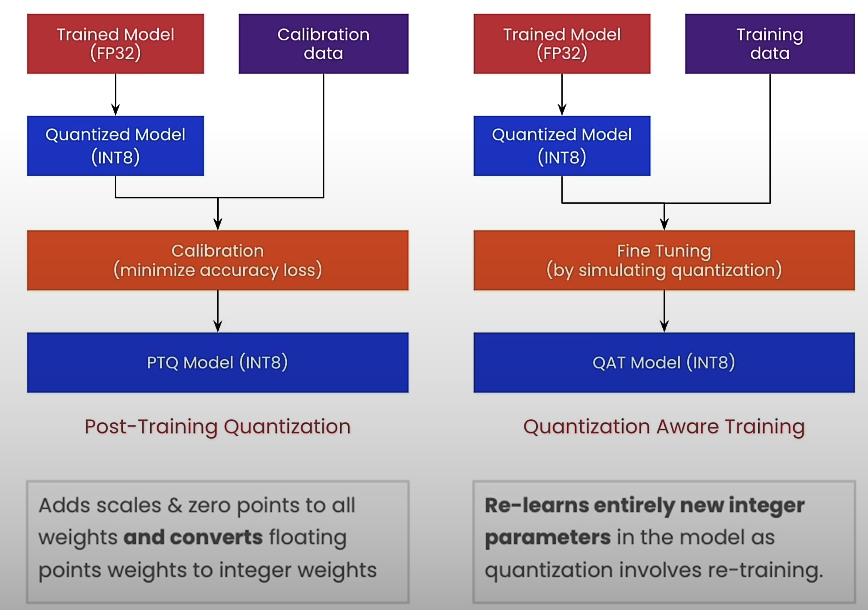
PTQ (Post Training Quantization) is used after the model has been trained by calibrating it using sample data. QAT (Quantization Aware Training) is used in model training to simulate the effects of quantization.
Let's start by creating a calibration dataset, preparing a model for quantization, performing post-training quantization, and validating off-target accuracy.
from datasets import load_dataset

# Use input resolution of the network
input_shape = (1, 3, 1024, 2048)

# Load 100 RGB images of urban scenes
dataset = load_dataset("UrbanSyn/UrbanSyn",
                split="train",
                data_files="rgb/*_00*.png")
dataset = dataset.train_test_split(1)

# Hold out for testing
calibration_dataset = dataset["train"]
test_dataset = dataset["test"]
calibration_dataset["image"][0]

# Setup calibration/inference pipleline

import torch
from torchvision import transforms

# Convert the PIL image above to Torch Tensor
preprocess = transforms.ToTensor()

# Get a sample image in the test dataset
test_sample_pil = test_dataset[0]["image"]
test_sample = preprocess(test_sample_pil).unsqueeze(0)
print(test_sample)
import torch.nn.functional as F
import numpy as np
from PIL import Image

def postprocess(output_tensor, input_image_pil):

    # Upsample the output to the original size
    output_tensor_upsampled = F.interpolate(
        output_tensor, input_shape[2:], mode="bilinear",
    )

    # Get top predicted class and convert to numpy
    output_predictions = output_tensor_upsampled[0].argmax(0).byte().detach().numpy().astype(np.uint8)

    # Overlay over original image
    color_mask = Image.fromarray(output_predictions).convert("P")

    # Create an appropriate palette for the Cityscapes classes
    palette = [
        128, 64, 128, 244, 35, 232, 70, 70, 70, 102, 102, 156,
        190, 153, 153, 153, 153, 153, 250, 170, 30, 220, 220, 0,
        107, 142, 35, 152, 251, 152, 70, 130, 180, 220, 20, 60,
        255, 0, 0, 0, 0, 142, 0, 0, 70, 0, 60, 100, 0, 80, 100,
        0, 0, 230, 119, 11, 32]
    palette = palette + (256 * 3 - len(palette)) * [0]
    color_mask.putpalette(palette)
    out = Image.blend(input_image_pil, color_mask.convert("RGB"), 0.5)
    return out

#  Setup model in floating point
from qai_hub_models.models.ffnet_40s.model import FFNet40S
model = FFNet40S.from_pretrained().model.eval()

# Run sample output through the model
test_output_fp32 = model(test_sample)
test_output_fp32

postprocess(test_output_fp32, test_sample_pil)

# Prepare Quantized Model
from qai_hub_models.models._shared.ffnet_quantized.model import FFNET_AIMET_CONFIG
from aimet_torch.batch_norm_fold import fold_all_batch_norms
from aimet_torch.model_preparer import prepare_model
from aimet_torch.quantsim import QuantizationSimModel

# Prepare model for 8-bit quantization
fold_all_batch_norms(model, [input_shape])
model = prepare_model(model)

# Setup quantization simulator
quant_sim = QuantizationSimModel(
    model,
    quant_scheme="tf_enhanced",
    default_param_bw=8,              # Use bitwidth 8-bit
    default_output_bw=8,
    config_file=FFNET_AIMET_CONFIG,
    dummy_input=torch.rand(input_shape),
)

# Perform post training quantization
size = 5  # Must be < 100

def pass_calibration_data(sim_model: torch.nn.Module, args):
    (dataset,) = args
    with torch.no_grad():
        for sample in dataset.select(range(size)):
            pil_image = sample["image"]
            input_batch = preprocess(pil_image).unsqueeze(0)

            # Feed sample through for calibration
            sim_model(input_batch)

# Run Post-Training Quantization (PTQ)
quant_sim.compute_encodings(pass_calibration_data, [calibration_dataset])
test_output_int8 = quant_sim.model(test_sample)
postprocess(test_output_int8, test_sample_pil)

# Run Quantized model on-device
import qai_hub
import qai_hub_models

from utils import get_ai_hub_api_token
ai_hub_api_token = get_ai_hub_api_token()

!qai-hub configure --api_token $ai_hub_api_token
devices = [
    "Samsung Galaxy S22 Ultra 5G",
    "Samsung Galaxy S22 5G",
    "Samsung Galaxy S22+ 5G",
    "Samsung Galaxy Tab S8",
    "Xiaomi 12",
    "Xiaomi 12 Pro",
    "Samsung Galaxy S22 5G",
    "Samsung Galaxy S23",
    "Samsung Galaxy S23+",
    "Samsung Galaxy S23 Ultra",
    "Samsung Galaxy S24",
    "Samsung Galaxy S24 Ultra",
    "Samsung Galaxy S24+",
]

import random
selected_device = random.choice(devices)
print(selected_device)
%run -m qai_hub_models.models.ffnet_40s_quantized.export -- --device "$selected_device"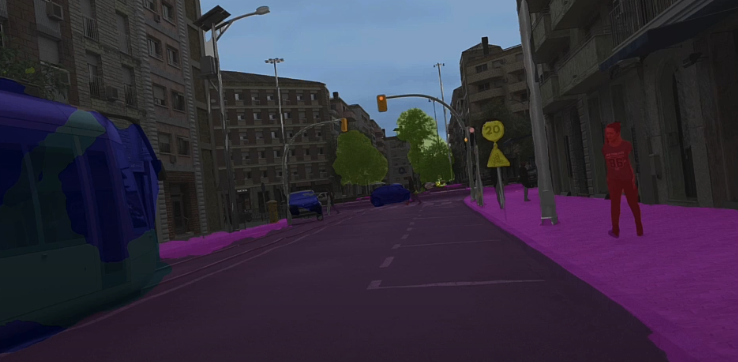

Device Integration
When we stream camera input, we perform GPU preprocessing on it. Preprocessing steps include converting YUV to RGB, downsampling to 224x224, exponential smoothing, upsampling, thresholding, and normalized box blurring.
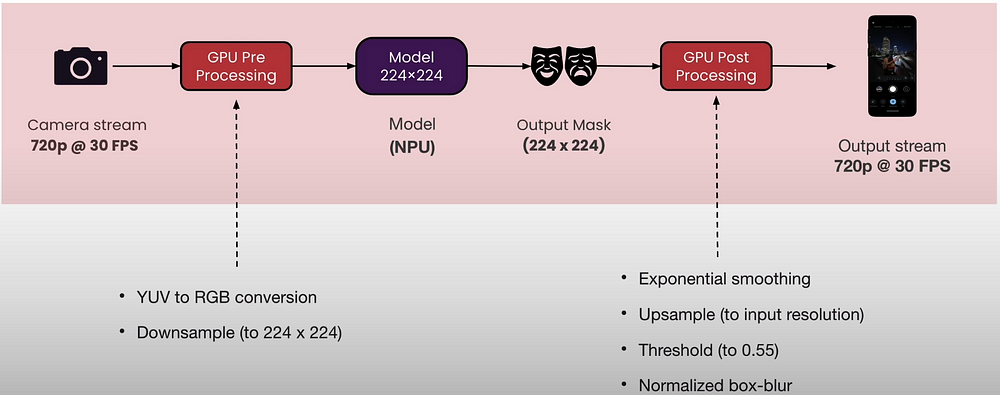
Preprocessing takes advantage of OpenCV on the GPU to speed up processing. Model inference is implemented using runtime APIs such as C++ and Java. OpenCV is used on GPUs to accelerate post-processing. Make sure to package all runtime dependencies for hardware acceleration.
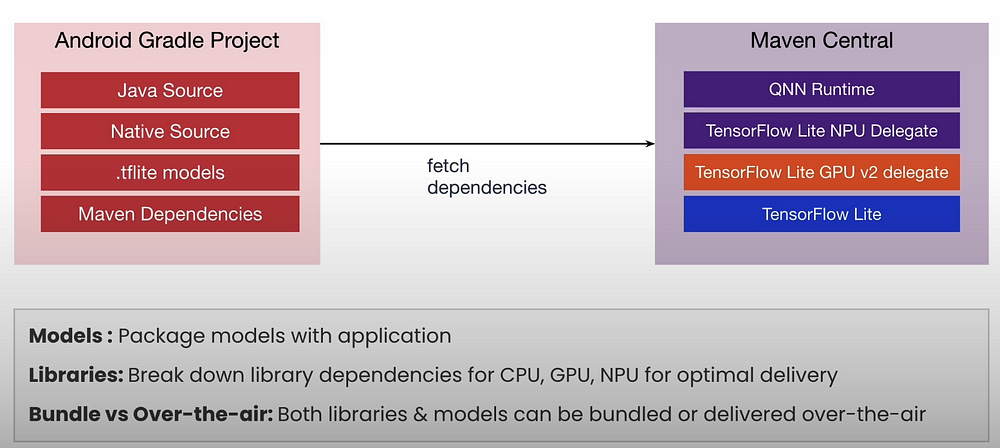
Android applications are built with Java or Native sources,.tflite models, and Maven dependencies. These retrieve the Maven central dependencies, which are QNN runtime, Tensorflow lite NPU delegate, and Tensorflow Lite.
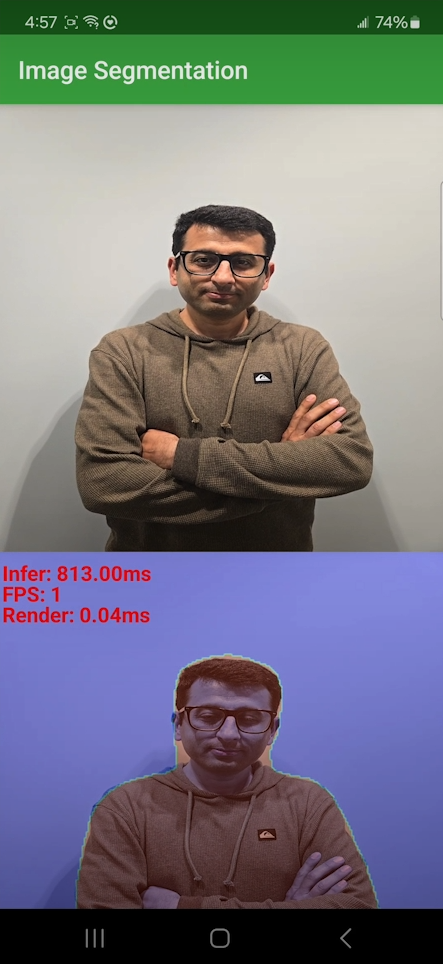
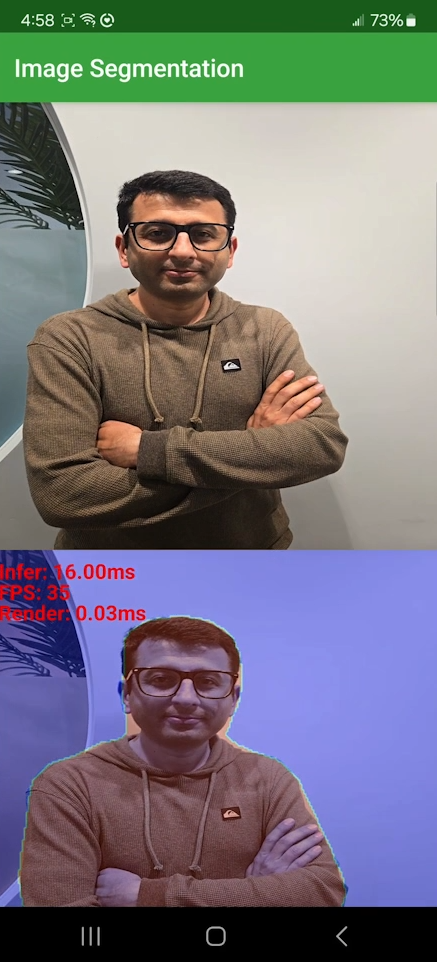
Demo: Real-time Segmentation
Real-time semantic segmentation runs at approximately 30 frames per second (FPS). Detects outdoor portions.
Compute Unit Utilization: Utilizes both GPU and NPU.
The fully quantized model runs exclusively on the NPU.
Pre/post processing runs on GPU.
Compatibility: All Android smartphones. NPU runs on Qualcomm-powered Android phones released after 2019. GPU on low-end smartphones.
Resource
[https://learn.deeplearning.ai/courses/introduction-to-on-device-ai/lesson/]


0 Comments