

Selecting Models
Huggingface hub provides numerous open-source models. There are numerous models; you can sort them by operation, language, and licensing.When you click on a model, it opens the model card. The model card displays key information about the model, such as the parameter count, the data on which it was trained, and the various checkpoints.
The model is utilized in Transformers, as shown by the button. The pipeline object performs the preprocessing steps for you.
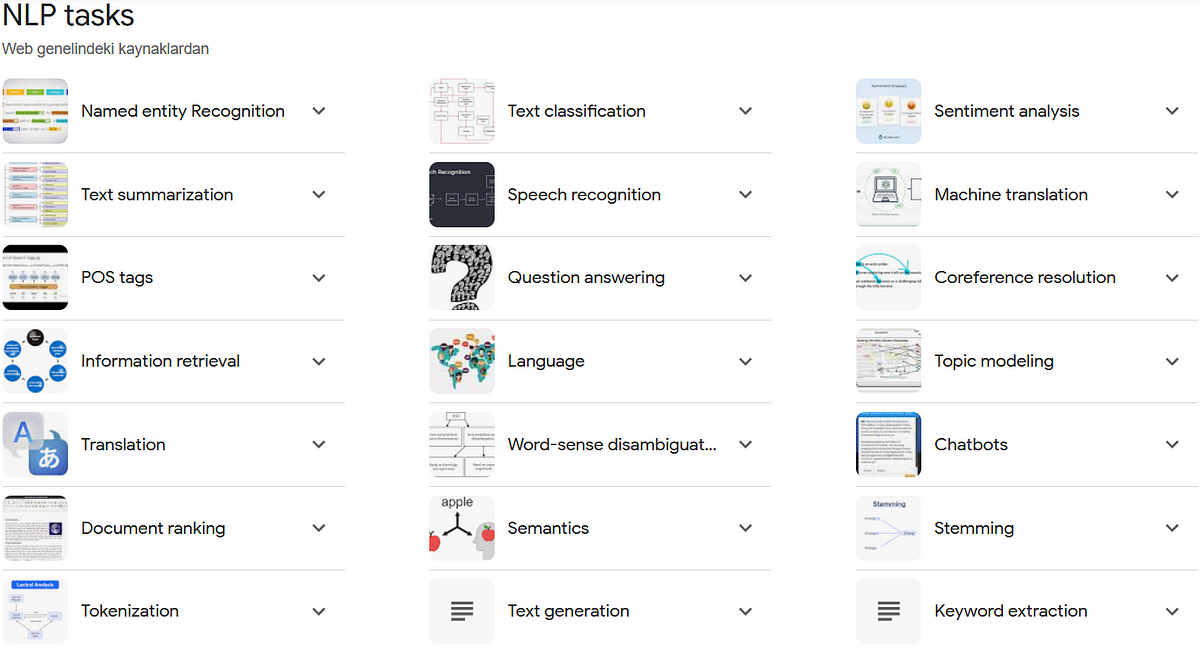
Natural Language Processing
Natural language processing (NLP) is a machine learning technology that enables computers to interpret, manipulate, and comprehend human language.
Let's create a chatbot using the pipeline object.
from transformers import pipeline
chatbot = pipeline(task="conversational",
                   model="./models/facebook/blenderbot-400M-distill")

user_message = """
What are some fun activities I can do in the winter?
"""
from transformers import Conversation
conversation = Conversation(user_message)
print(conversation)

conversation = chatbot(conversation)
print(conversation)
print(chatbot(Conversation("What else do you recommend?")))
However, because the chatbot has no memory of previous talks, it may respond in a random manner. To include former talks in the LLM's context, add a'message' with the previous chat history.
conversation.add_message(
    {"role": "user",
     "content": """
What else do you recommend?
"""
    })
print(conversation)

conversation = chatbot(conversation)
print(conversation)
Human evaluation is the most valuable type of evaluation. There is an LLM evaluation arena where people can choose which of two answers is superior.
Based on these scores, a benchmark is established:
Discover amazing ML apps made by the communityhuggingface.co
Translation and Summarization
Create a translation pipeline using the Transformers Library:
!pip install transformers
!pip install torch

from transformers import pipeline
import torch

translator = pipeline(task="translation",
                      model="./models/facebook/nllb-200-distilled-600M",
                      torch_dtype=torch.bfloat16)

text = """\
My puppy is adorable, \
Your kitten is cute.
Her panda is friendly.
His llama is thoughtful. \
We all have nice pets!"""

text_translated = translator(text,
                             src_lang="eng_Latn",
                             tgt_lang="fra_Latn")

print(text_translated)
To select additional languages, you may locate the various language codes on the website.: Languages in FLORES-200
For example:
- Afrikaans: afr_Latn
- Chinese: zho_Hans
- Egyptian Arabic: arz_Arab
- French: fra_Latn
- German: deu_Latn
- Greek: ell_Grek
- Hindi: hin_Deva
- Indonesian: ind_Latn
- Italian: ita_Latn
- Japanese: jpn_Jpan
- Korean: kor_Hang
- Persian: pes_Arab
- Portuguese: por_Latn
- Russian: rus_Cyrl
- Spanish: spa_Latn
- Swahili: swh_Latn
- Thai: tha_Thai
- Turkish: tur_Latn
- Vietnamese: vie_Latn
- Zulu: zul_Latn
To free up memory on the machine so that the rest of the code may run, please execute the following commands.
import gc
del translator
gc.collect()
Creating the summarizing pipeline with Transformers Library:
summarizer = pipeline(task="summarization",
                      model="./models/facebook/bart-large-cnn",
                      torch_dtype=torch.bfloat16)

text = """Paris is the capital and most populous city of France, with
          an estimated population of 2,175,601 residents as of 2018,
          in an area of more than 105 square kilometres (41 square
          miles). The City of Paris is the centre and seat of
          government of the region and province of Île-de-France, or
          Paris Region, which has an estimated population of
          12,174,880, or about 18 percent of the population of France
          as of 2017."""

summary = summarizer(text,
                     min_length=10,
                     max_length=100)

print(summary)
Sentence Embeddings
In natural language processing, sentence embedding is a numeric representation of a sentence in the form of a real number vector that encodes relevant semantic information.
!pip install sentence-transformersCreate a sentence embedding pipeline using the Transformers Library:
from sentence_transformers import SentenceTransformer

model = SentenceTransformer("all-MiniLM-L6-v2")
sentences1 = ['The cat sits outside',
              'A man is playing guitar',
              'The movies are awesome']
embeddings1 = model.encode(sentences1, convert_to_tensor=True)
print(embeddings1)


sentences2 = ['The dog plays in the garden',
              'A woman watches TV',
              'The new movie is so great']
embeddings2 = model.encode(sentences2,
                           convert_to_tensor=True)
print(embeddings2)
Calculate the cosine similarity between two sentences to determine how similar they are.
from sentence_transformers import util
cosine_scores = util.cos_sim(embeddings1,embeddings2)
print(cosine_scores)
for i in range(len(sentences1)):
    print("{} \t\t {} \t\t Score: {:.4f}".format(sentences1[i],
                                                 sentences2[i],
                                                 cosine_scores[i][i]))
Zero-shot Audio Classification
Sound Classification is one of the most popular applications of Audio Deep Learning. It entails learning to classify sounds and determine which group they belong in.
!pip install transformers
!pip install datasets
!pip install soundfile
!pip install librosa
The librosa library may require the installation of ffmpeg. This librosa page contains installation instructions for FFmpeg.
Preparing the dataset of audio recordings
from datasets import load_dataset, load_from_disk

# This dataset is a collection of different sounds of 5 seconds
# dataset = load_dataset("ashraq/esc50",
#                       split="train[0:10]")
dataset = load_from_disk("./models/ashraq/esc50/train")

audio_sample = dataset[0]
print(audio_sample)

from IPython.display import Audio as IPythonAudio
IPythonAudio(audio_sample["audio"]["array"],
             rate=audio_sample["audio"]["sampling_rate"])
Create audio categorization pipeline with 🤗 Transformers Library.
from transformers import pipeline

zero_shot_classifier = pipeline(
    task="zero-shot-audio-classification",
    model="./models/laion/clap-htsat-unfused")
More info on laion/clap-htsat-unfused.
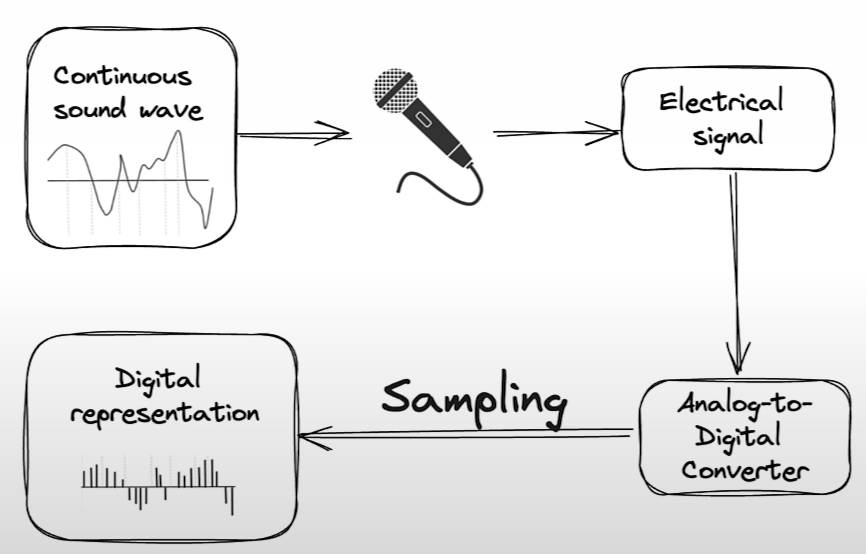
Sampling Rate
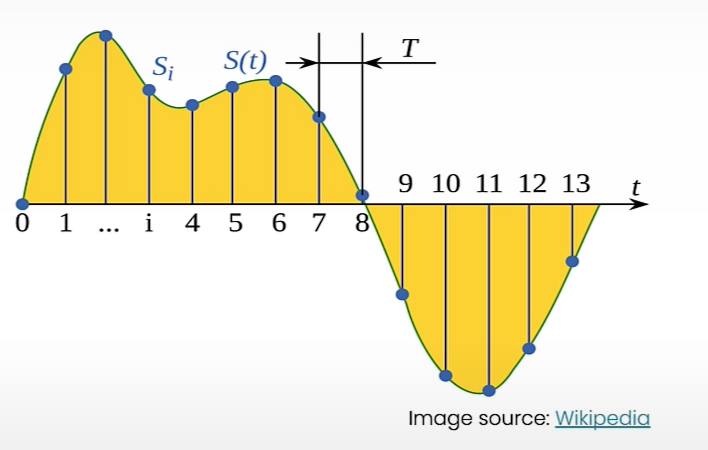
The sampling rate (Hz) is the number of samples taken in a single second.
Examples of sampling rates are 8k Hz for telephone and radio, 16k for human speech recording, and 192k for high-resolution audio.
The sampling rate for transformer models
In a 5-second sound:
- At 8000 Hz => 5*8000 = 40,000 signal values.
- At 16000 Hz => 5*16000 = 80,000 signal values.
- At 192000 Hz => 5*192000 = 960,000 signal values.
For a transformer trained on 16 kHz audio, an array of 960k values corresponds to a 60-second recording at 16 kHz.
How long does one second of high-resolution audio (192,000 Hz) appear to the Whisper model (which has been taught to expect audio files at 16,000 Hz)?
(1 * 192000) / 16000 = 12.0 . The model perceives one second of high-resolution audio as twelve seconds of audio.
How about five seconds of audio?
5 * 192000 / 16000 = 60. The model perceives 0.5 seconds of high-resolution audio as 60 seconds of audio.
zero_shot_classifier.feature_extractor.sampling_rate
audio_sample["audio"]["sampling_rate"]
from datasets import Audio
dataset = dataset.cast_column(
    "audio",
     Audio(sampling_rate=48_000))
audio_sample = dataset[0]


candidate_labels = ["Sound of a dog",
                    "Sound of vacuum cleaner"]
zero_shot_classifier(audio_sample["audio"]["array"],
                     candidate_labels=candidate_labels)
candidate_labels = ["Sound of a child crying",
                    "Sound of vacuum cleaner",
                    "Sound of a bird singing",
                    "Sound of an airplane"]
Automatic Speech Recognition
Automatic Speech Recognition (ASR) is the application of machine learning or artificial intelligence (AI) technology to convert human speech into legible text.
  !pip install transformers
  !pip install -U datasets
  !pip install soundfile
  !pip install librosa
  !pip install gradio
Data preparation
from datasets import load_dataset

dataset = load_dataset("librispeech_asr",
                       split="train.clean.100",
                       streaming=True,
                       trust_remote_code=True)

example = next(iter(dataset))

dataset_head = dataset.take(5)
list(dataset_head)

list(dataset_head)[2]
print(example)

from IPython.display import Audio as IPythonAudio

IPythonAudio(example["audio"]["array"],
             rate=example["audio"]["sampling_rate"])
Build the pipeline
from transformers import pipeline

asr = pipeline(task="automatic-speech-recognition",
               model="./models/distil-whisper/distil-small.en")
asr.feature_extractor.sampling_rate
example['audio']['sampling_rate']
asr(example["audio"]["array"])
example["text"]
Info about distil-whisper/distil-small.en
Build a shareable app with Gradio
import os
import gradio as gr

demo = gr.Blocks()

def transcribe_speech(filepath):
    if filepath is None:
        gr.Warning("No audio found, please retry.")
        return ""
    output = asr(filepath)
    return output["text"]

mic_transcribe = gr.Interface(
    fn=transcribe_speech,
    inputs=gr.Audio(sources="microphone",
                    type="filepath"),
    outputs=gr.Textbox(label="Transcription",
                       lines=3),
    allow_flagging="never")

file_transcribe = gr.Interface(
    fn=transcribe_speech,
    inputs=gr.Audio(sources="upload",
                    type="filepath"),
    outputs=gr.Textbox(label="Transcription",
                       lines=3),
    allow_flagging="never",
)

with demo:
    gr.TabbedInterface(
        [mic_transcribe,
         file_transcribe],
        ["Transcribe Microphone",
         "Transcribe Audio File"],
    )

demo.launch(share=True,
            server_port=int(os.environ['PORT1']))

demo.close()
Testing with a longer audio file
import soundfile as sf
import io
audio, sampling_rate = sf.read('narration_example.wav')
sampling_rate
asr.feature_extractor.sampling_rate
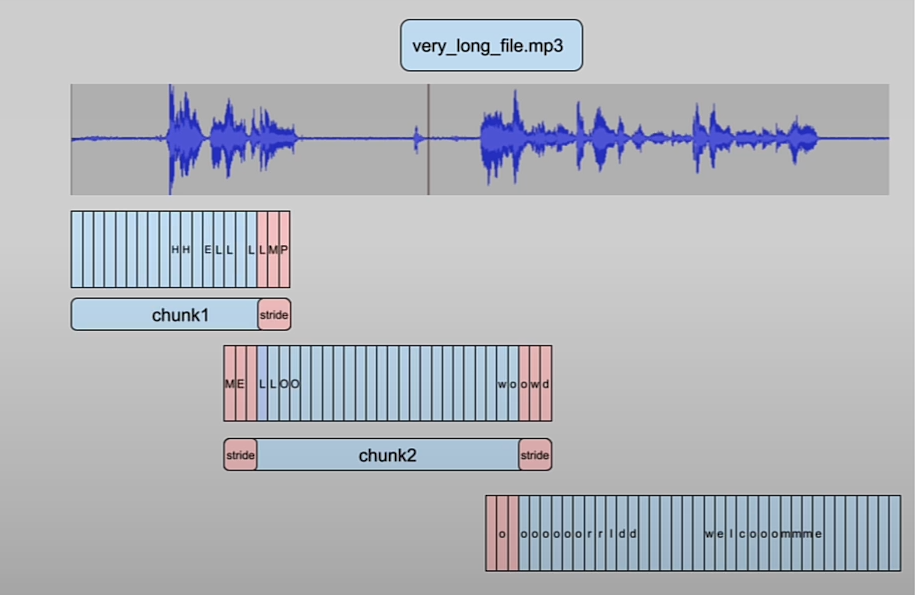
asr(audio) # ValueError: We expect a single channel audio input for AutomaticSpeechRecognitionPipelineConvert the audio from stereo to mono (Using librosa)
audio.shape

import numpy as np

audio_transposed = np.transpose(audio)
audio_transposed.shape
import librosa
audio_mono = librosa.to_mono(audio_transposed)
IPythonAudio(audio_mono,
             rate=sampling_rate)
asr(audio_mono) # Warning: The cell above might throw a warning because the sample rate of the audio sample is not the same of the sample rate of the model.
Let’s fix this.
sampling_rate
asr.feature_extractor.sampling_rate
audio_16KHz = librosa.resample(audio_mono,
                               orig_sr=sampling_rate,
                               target_sr=16000)
asr(
    audio_16KHz,
    chunk_length_s=30, # 30 seconds
    batch_size=4,
    return_timestamps=True,
)["chunks"]
Build Gradio UI
import gradio as gr
demo = gr.Blocks()

def transcribe_long_form(filepath):
    if filepath is None:
        gr.Warning("No audio found, please retry.")
        return ""
    output = asr(
      filepath,
      max_new_tokens=256,
      chunk_length_s=30,
      batch_size=8,
    )
    return output["text"]

mic_transcribe = gr.Interface(
    fn=transcribe_long_form,
    inputs=gr.Audio(sources="microphone",
                    type="filepath"),
    outputs=gr.Textbox(label="Transcription",
                       lines=3),
    allow_flagging="never")

file_transcribe = gr.Interface(
    fn=transcribe_long_form,
    inputs=gr.Audio(sources="upload",
                    type="filepath"),
    outputs=gr.Textbox(label="Transcription",
                       lines=3),
    allow_flagging="never",
)

with demo:
    gr.TabbedInterface(
        [mic_transcribe,
         file_transcribe],
        ["Transcribe Microphone",
         "Transcribe Audio File"],
    )
demo.launch(share=True,
            server_port=int(os.environ['PORT1']))

demo.close()
Test your own audio files.
import soundfile as sf
import io

audio, sampling_rate = sf.read('narration_example.wav')

sampling_rate

asr.feature_extractor.sampling_rate
Text to Speech
    !pip install transformers
    !pip install gradio
    !pip install timm
    !pip install inflect
    !pip install phonemizer
Note: py-espeak-ng is only available Linux operating systems.
To run locally on a Linux system, use these commands:
sudo apt-get update
sudo apt-get install espeak-ng
pip install py-espeak-ng
Build the text-to-speech pipeline using the 🤗 Transformers Library
from transformers import pipeline

narrator = pipeline("text-to-speech",
                    model="./models/kakao-enterprise/vits-ljs")
Info about kakao-enterprise/vits-ljs
text = """
Researchers at the Allen Institute for AI, \
HuggingFace, Microsoft, the University of Washington, \
Carnegie Mellon University, and the Hebrew University of \
Jerusalem developed a tool that measures atmospheric \
carbon emitted by cloud servers while training machine \
learning models. After a model’s size, the biggest variables \
were the server’s location and time of day it was active.
"""

narrated_text = narrator(text)

from IPython.display import Audio as IPythonAudio

IPythonAudio(narrated_text["audio"][0],
             rate=narrated_text["sampling_rate"])
Object Detection
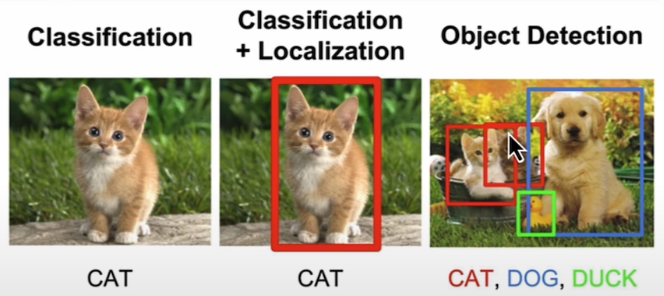
Object detection is a computer vision and image processing technique that detects instances of semantic items of a specific class (such as individuals, buildings, or cars) in digital photos and videos.
    !pip install transformers
    !pip install gradio
    !pip install timm
    !pip install inflect
    !pip install phonemizer
Note: py-espeak-ng is only available in Linux operating systems.
To run locally on a Linux system, use these commands:
sudo apt-get update
sudo apt-get install espeak-ng
pip install py-espeak-ng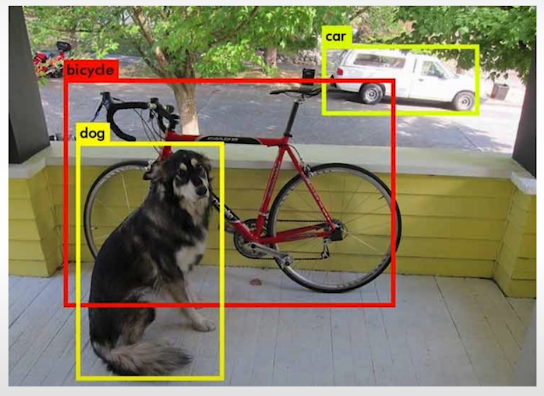
Build the object-detection pipeline using 🤗 Transformers Library
This model was released in the paper End-to-End Object Detection with Transformers by Carion et al. (2020)
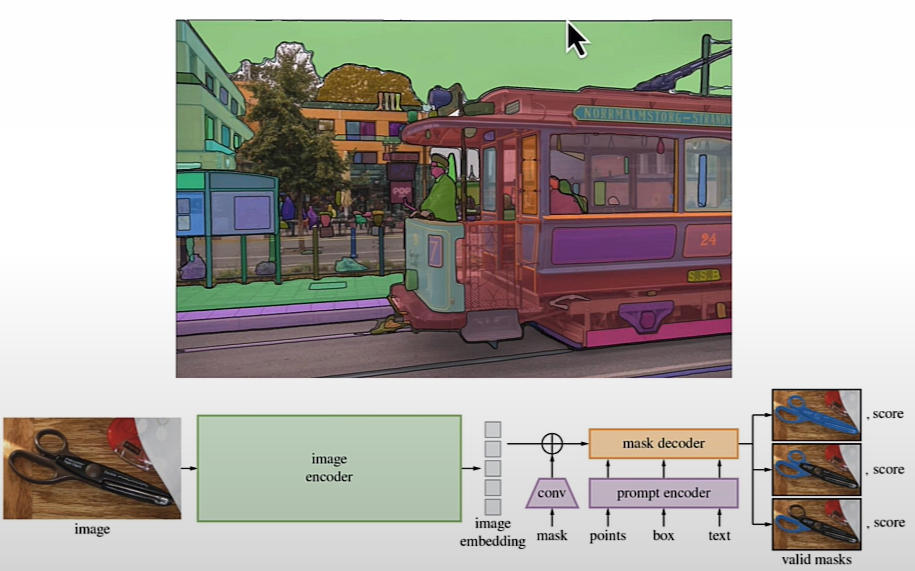
from helper import load_image_from_url, render_results_in_image
from transformers import pipeline

od_pipe = pipeline("object-detection", "./models/facebook/detr-resnet-50")
Info about facebook/detr-resnet-50
Explore more of the Hugging Face Hub for more object detection models
Use the Pipeline
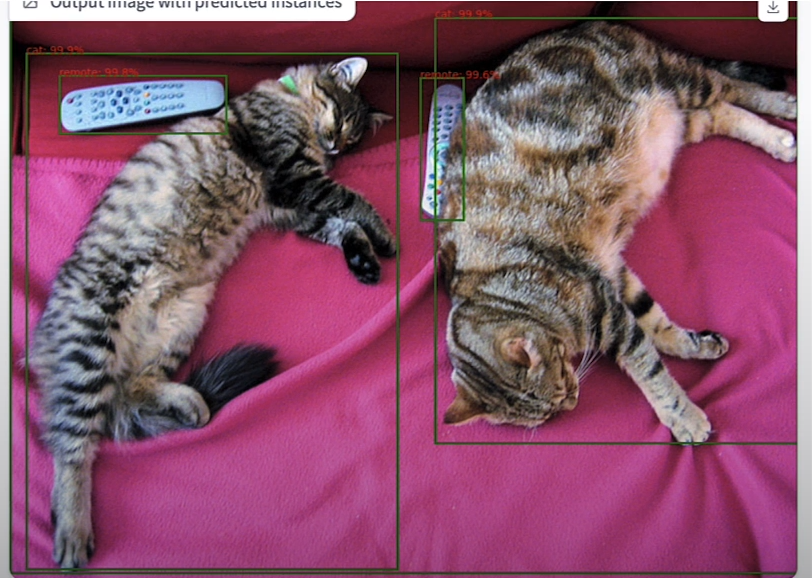
from PIL import Image
raw_image = Image.open('huggingface_friends.jpg')
raw_image.resize((569, 491))
pipeline_output = od_pipe(raw_image)
# Return the results from the pipeline using the helper function render_results_in_image.
processed_image = render_results_in_image(
    raw_image,
    pipeline_output)
processed_image
Demo with Gradio
import os
import gradio as gr

def get_pipeline_prediction(pil_image):

    pipeline_output = od_pipe(pil_image)

    processed_image = render_results_in_image(pil_image,
                                            pipeline_output)
    return processed_image

demo = gr.Interface(
  fn=get_pipeline_prediction,
  inputs=gr.Image(label="Input image",
                  type="pil"),
  outputs=gr.Image(label="Output image with predicted instances",
                   type="pil")
)
# share=True will provide an online link to access to the demo

demo.launch(share=True, server_port=int(os.environ['PORT1']))
demo.close()
Make an AI Powered Audio Assistant
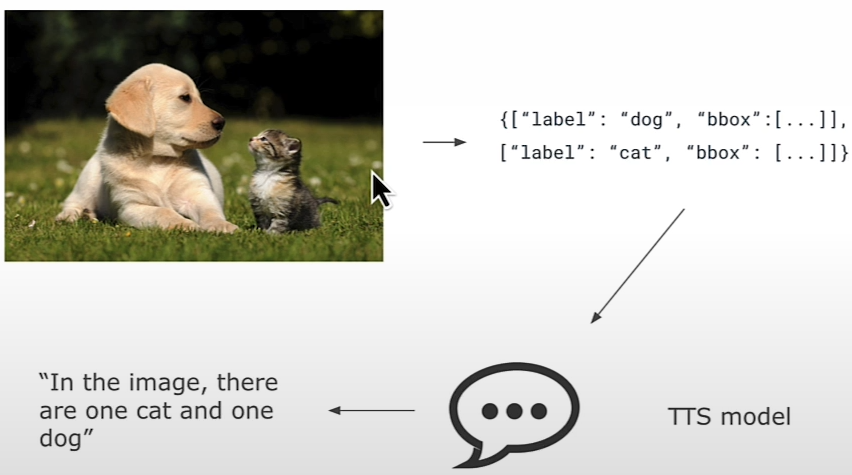
Combine the object detector with a text-to-speech model to help determine what is in the image. Examine the results of the object detection pipeline.
pipeline_output
od_pipe
raw_image = Image.open('huggingface_friends.jpg')
raw_image.resize((284, 245))
from helper import summarize_predictions_natural_language
text = summarize_predictions_natural_language(pipeline_output)
text
Generate Audio Narration of an Image
tts_pipe = pipeline("text-to-speech",
                    model="./models/kakao-enterprise/vits-ljs")
More info about kakao-enterprise/vits-ljs.
narrated_text = tts_pipe(text)Play the Generated Audio
from IPython.display import Audio as IPythonAudio
IPythonAudio(narrated_text["audio"][0],
             rate=narrated_text["sampling_rate"])
Image Segmentation

    !pip install transformers
    !pip install gradio
    !pip install timm
    !pip install torchvision
Mask Generation with SAM
The Segment Anything Model (SAM) model was released by Meta AI.
from transformers import pipeline
sam_pipe = pipeline("mask-generation",
    "./models/Zigeng/SlimSAM-uniform-77")
Info about Zigeng/SlimSAM-uniform-77

from PIL import Image
raw_image = Image.open('meta_llamas.jpg')
raw_image.resize((720, 375))
Running this will require some time. The larger the value of 'points_per_batch', the better pipeline inference will be.
output = sam_pipe(raw_image, points_per_batch=32)
from helper import show_pipe_masks_on_image
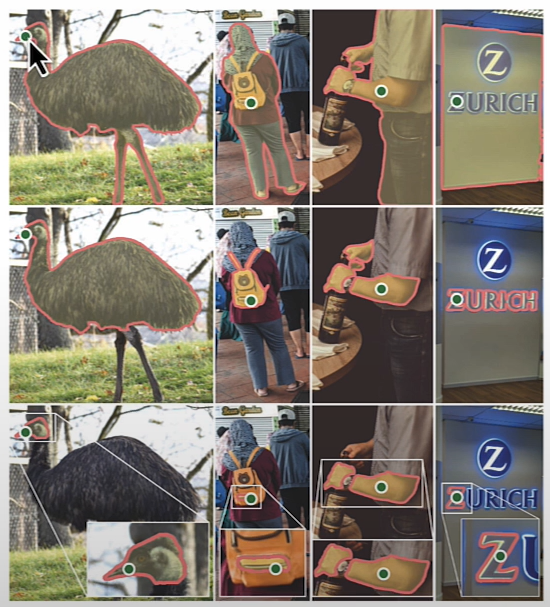
show_pipe_masks_on_image(raw_image, output)Faster Inference: Infer an Image and a Single Point
from transformers import SamModel, SamProcessor
model = SamModel.from_pretrained(
    "./models/Zigeng/SlimSAM-uniform-77")

processor = SamProcessor.from_pretrained(
    "./models/Zigeng/SlimSAM-uniform-77")
raw_image.resize((720, 375))
Separate the blue shirt Andrew is wearing. Provide any single 2D point that would be in the region (blue shirt).
input_points = [[[1600, 700]]]Create the input with the image and a single point. return_tensors="pt" returns PyTorch Tensors.
inputs = processor(raw_image,
                 input_points=input_points,
                 return_tensors="pt")
Determine the model's output based on the inputs.
import torch
with torch.no_grad():
    outputs = model(**inputs)
predicted_masks = processor.image_processor.post_process_masks(
    outputs.pred_masks,
    inputs["original_sizes"],
    inputs["reshaped_input_sizes"]
)
The length of predicted_masks corresponds to the number of photos utilized in the input.
len(predicted_masks)predicted_mask = predicted_masks[0]
predicted_mask.shape
outputs.iou_scores
from helper import show_mask_on_image
for i in range(3):
show_mask_on_image(raw_image, predicted_mask[:, i])Depth Estimation with DPT
This model was introduced in the paper Vision Transformers for Dense Prediction by Ranftl et al. (2021) and first released in isl-org/DPT.
depth_estimator = pipeline(task="depth-estimation",
                        model="./models/Intel/dpt-hybrid-midas")
Info about ‘Intel/dpt-hybrid-midas’
raw_image = Image.open('gradio_tamagochi_vienna.png')
raw_image.resize((806, 621))
output = depth_estimator(raw_image)
output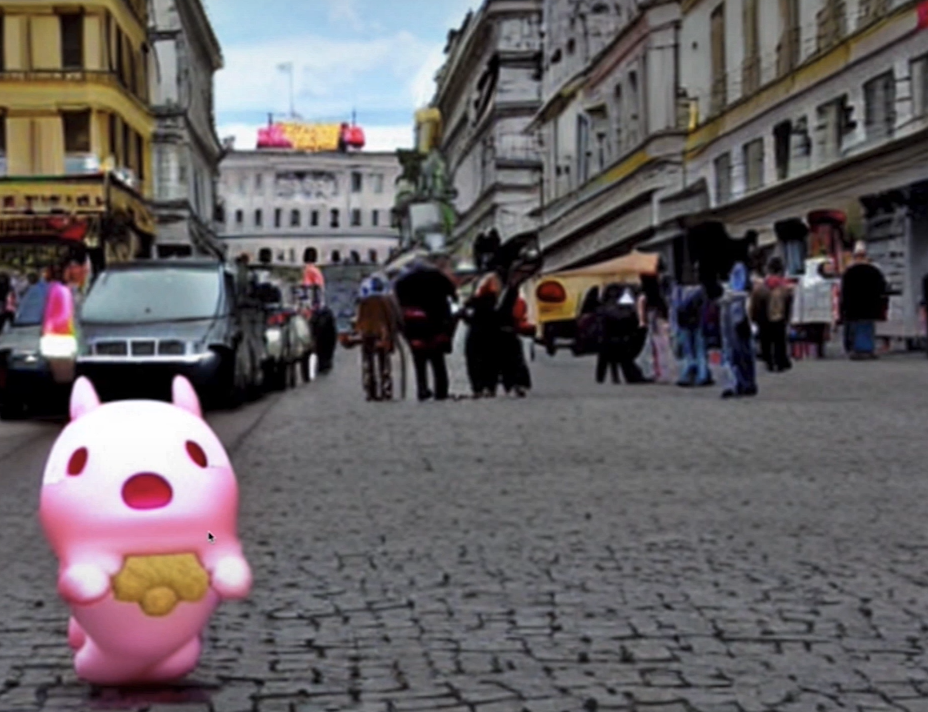
Post-process the output image to make it the same size as the original.
output["predicted_depth"].shape
output["predicted_depth"].unsqueeze(1).shape
prediction = torch.nn.functional.interpolate(
    output["predicted_depth"].unsqueeze(1),
    size=raw_image.size[::-1],
    mode="bicubic",
    align_corners=False,
)
prediction.shape
raw_image.size[::-1],
prediction
Normalize the anticipated tensors (from 0 to 255) so they may be presented.
import numpy as np
output = prediction.squeeze().numpy()
formatted = (output * 255 / np.max(output)).astype("uint8")
depth = Image.fromarray(formatted)
depth
Gradio Example:
import os
import gradio as gr
from transformers import pipeline
def launch(input_image):
out = depth_estimator(input_image)
# resize the prediction
prediction = torch.nn.functional.interpolate(
out["predicted_depth"].unsqueeze(1),
size=input_image.size[::-1],
mode="bicubic",
align_corners=False,
)
# normalize the prediction
output = prediction.squeeze().numpy()
formatted = (output * 255 / np.max(output)).astype("uint8")
depth = Image.fromarray(formatted)
return depth
iface = gr.Interface(launch,
inputs=gr.Image(type='pil'),
outputs=gr.Image(type='pil'))
iface.launch(share=True, server_port=int(os.environ['PORT1']))
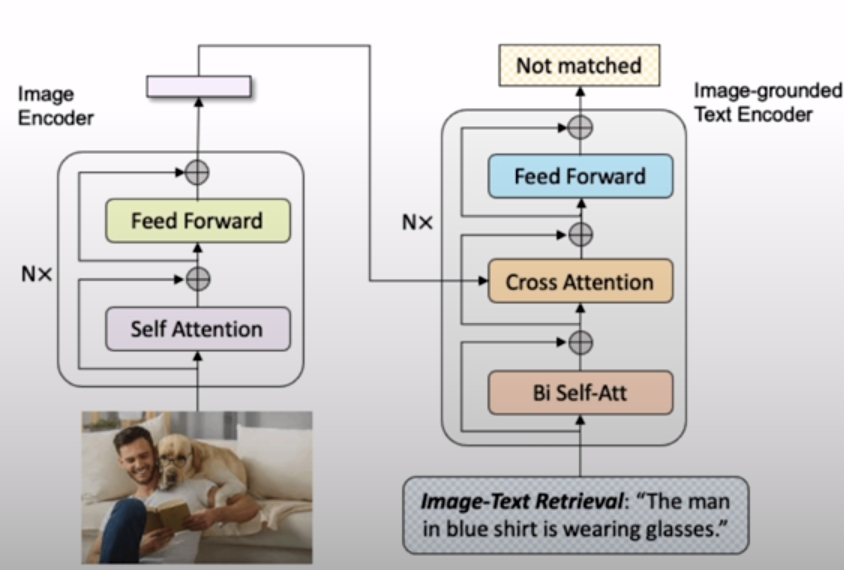
iface.close()Image Retrieval
An image retrieval system is a computer system that allows users to browse, search, and retrieve images from a huge collection of digital images.
    !pip install transformers
    !pip install torch
Load the model and the processor.
from transformers import BlipForImageTextRetrieval
model = BlipForImageTextRetrieval.from_pretrained(
    "./models/Salesforce/blip-itm-base-coco")
More info about Salesforce/blip-itm-base-coco.
from transformers import AutoProcessor

processor = AutoProcessor.from_pretrained(
    "./models/Salesforce/blip-itm-base-coco")

img_url = 'https://storage.googleapis.com/sfr-vision-language-research/BLIP/demo.jpg'

from PIL import Image
import requests
raw_image =  Image.open(
    requests.get(img_url, stream=True).raw).convert('RGB')
raw_image
Test, if the image matches the text
text = "an image of a woman and a dog on the beach"
inputs = processor(images=raw_image,
                   text=text,
                   return_tensors="pt")
inputs
itm_scores = model(**inputs)[0]
itm_scores
import torch
To calculate probabilities, use a softmax layer.
itm_score = torch.nn.functional.softmax(
    itm_scores,dim=1)
itm_score
print(f"""\
The image and text are matched \
with a probability of {itm_score[0][1]:.4f}""")
Image Captioning
Image captioning is the effort of collecting relevant information from an image and creating appropriate captions to describe its content.
!pip install transformersLoad the model and processor:
from transformers import BlipForConditionalGeneration
model = BlipForConditionalGeneration.from_pretrained(
    "./models/Salesforce/blip-image-captioning-base")
Info about Salesforce/blip-image-captioning-base
from transformers import AutoProcessor
processor = AutoProcessor.from_pretrained(
    "./models/Salesforce/blip-image-captioning-base")

from PIL import Image
image = Image.open("./beach.jpeg")
image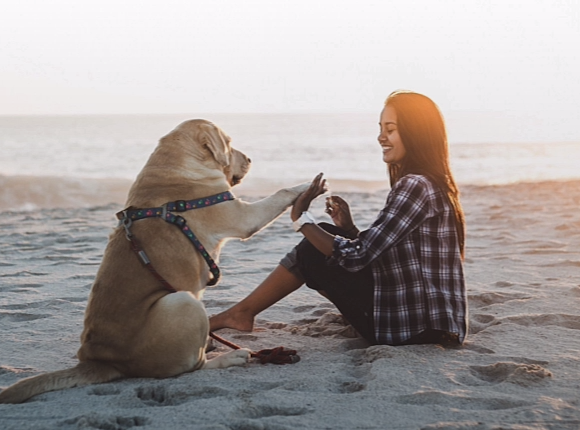
text = "a photograph of"
inputs = processor(image, text, return_tensors="pt")
out = model.generate(**inputs)
print(processor.decode(out[0], skip_special_tokens=True)) # A photograph of a woman and her dog on the beach.
Unconditional Image Captioning
inputs = processor(image,return_tensors="pt")
out = model.generate(**inputs)
print(processor.decode(out[0], skip_special_tokens=True))
Multimodel Visual Question Answering
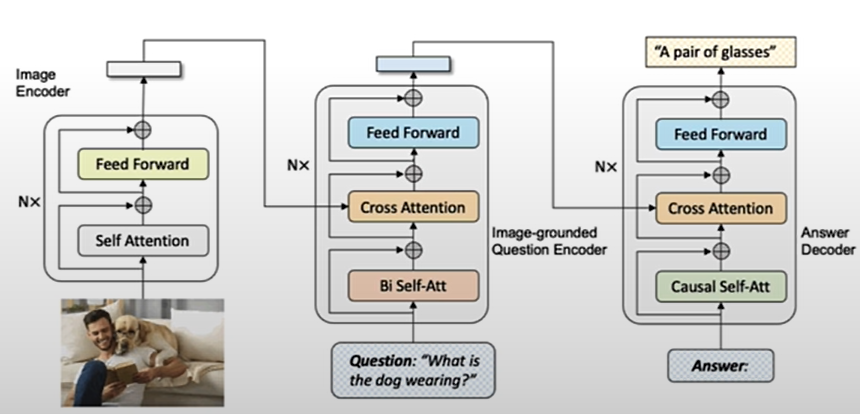
Visual Question Answering (VQA) is a key cross-disciplinary challenge in computer vision and natural language processing that requires a computer to generate a natural language response based on images and questions posed by the images.
!pip install transformersLoad model and processor:
from transformers import BlipForQuestionAnswering
model = BlipForQuestionAnswering.from_pretrained(
    "./models/Salesforce/blip-vqa-base")
Info about Salesforce/blip-vqa-base
from transformers import AutoProcessor
processor = AutoProcessor.from_pretrained(
    "./models/Salesforce/blip-vqa-base")

from PIL import Image
image = Image.open("./beach.jpeg")

question = "how many dogs are in the picture?"
inputs = processor(image, question, return_tensors="pt")
out = model.generate(**inputs)
print(processor.decode(out[0], skip_special_tokens=True))
Zero-shot Image Classification
!pip install transformersfrom transformers import CLIPModel
model = CLIPModel.from_pretrained(
"./models/openai/clip-vit-large-patch14")
from transformers import AutoProcessor
processor = AutoProcessor.from_pretrained(
"./models/openai/clip-vit-large-patch14")More info about openai/clip-vit-large-patch14.
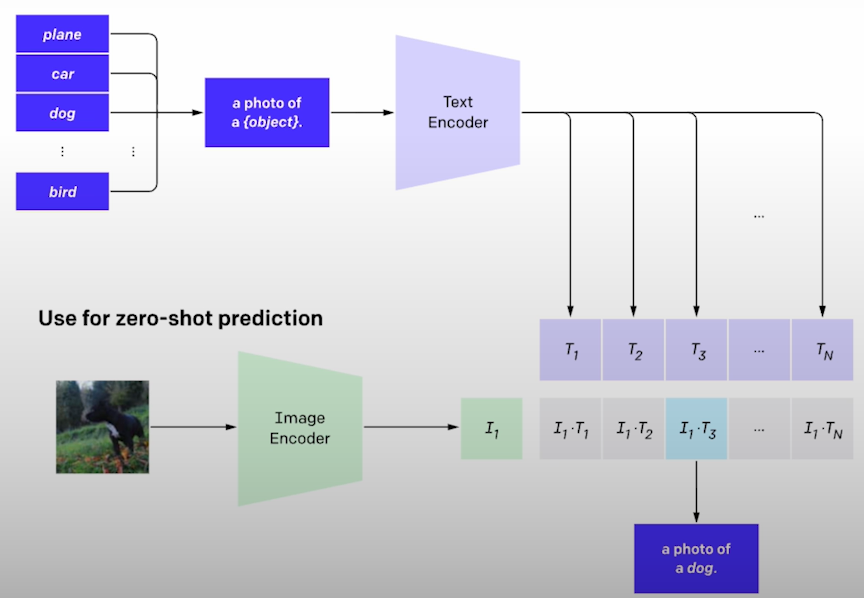
CLIP (Contrasive Language-Image Pre-Training) is a multimodel vision and language model that can do zero-shot image categorization.
from PIL import Image
image = Image.open("./kittens.jpeg")
labels = ["a photo of a cat", "a photo of a dog"]
inputs = processor(text=labels,
                   images=image,
                   return_tensors="pt",
                   padding=True)
outputs = model(**inputs)
outputs.logits_per_image
probs = outputs.logits_per_image.softmax(dim=1)[0]
probs = list(probs)
for i in range(len(labels)):
  print(f"label: {labels[i]} - probability of {probs[i].item():.4f}")
# label: a photo of a cat - probability of 0.9992
Deploying ML Models on 🤗 Hub using Gradio
!pip install transformers
!pip install gradio
!pip install gradio_client
If you encounter problems while performing an API request to your own space, you can try upgrading your version of gradio_client.
pip install -U gradio_clientYou can establish an account on hugging face at [huggingface.co] and follow the instructions provided.
import os
import gradio as gr
from transformers import pipeline
pipe = pipeline("image-to-text",
                model="./models/Salesforce/blip-image-captioning-base")
def launch(input):
    out = pipe(input)
    return out[0]['generated_text']
iface = gr.Interface(launch,
                     inputs=gr.Image(type='pil'),
                     outputs="text")
iface.launch(share=True,
             server_port=int(os.environ['PORT1']))
iface.close()
Visit https://huggingface.co/spaces.
Click the "Create New Space" button.
Give the space a name, such "blip-image-captioning".
Select a license, such as Apache 2.0.
Click "Gradio" in the "Select the Space SDK" box.
For Hardware, select the default free choice. "CPU Basic"
Leave it as "public".
Click "Create Space".
You'll see a new page with instructions for cloning and updating a GitHub repository.
If you want to get a small app up and running quickly, you may add the necessary files right in the web browser. Click the "Files" tab at the top.
Click "+ Add File" then "Create New File".
Create a file named requirements.txt.
Paste the following: transformers
torch
gradioKeep "Commit Directly to the Main Branch" selected.
Select "commit new file to main".
In the "Name Your File" textbox, input "app.py".
In the textbox for your code, paste the code that you ran above, or copy the block below: import gradio as gr
from transformers import pipeline
pipe = pipeline("image-to-text",
model="Salesforce/blip-image-captioning-base")
def launch(input):
out = pipe(input)
return out[0]['generated_text']
iface = gr.Interface(launch,
inputs=gr.Image(type='pil'),
outputs="text")
iface.launch()Keep "Commit Directly to the Main Branch" selected.
Select "Commit new file to main".
The app will remain "Building" for a few minutes.
To view the console while the space is being developed, click on the "App" menu to the left of the "Files" menu.
When the build is finished, you'll see your app!
At the bottom, select "Use via API" to view sample code for using your model with an API call.
If you haven't done so before, run the pip install command.
Gradio_client should be installed in the classroom by default.
Copy the sample code, which will seem like this: from gradio_client import Client
client = Client("eddyS/blip-image-captioning-2")
result = client.predict(
"https://raw.githubusercontent.com/gradio-app/gradio/main/test/test_files/bus.png", # filepath in 'input' Image component
api_name="/predict"
)
print(result)You can replace the string within the client.Use predict() with a string pointing to a local file.
In the classroom, you can use two image files.
"kittens.jpg" "huggingface_friends.jpg"
Please feel free to upload your own to the file directory. So, your code might look like this: from gradio_client import Client
client = Client("eddyS/blip-image-captioning-2")
result = client.predict(
"kittens.jpg",
api_name="/predict"
)
print(result)- Inspect the information in the API.
client.view_api()
- The output may look like this:
Client.predict() Usage Info
---------------------------
Named API endpoints: 1
- predict(input, api_name="/predict") -> output
Parameters:
- [Image] input: filepath
Returns:
- [Textbox] output: str
Access to your private space as an API
You can make your space private, allowing access only with an access token.To make the place private, select the "Settings" menu at the top. Scroll down to "Change space visibility" and select the "Make private" button.
To obtain an access token, navigate to your profile (click the profile icon).
On your profile page, click the "Settings" icon to the left.
In your profile settings, on the left side menu, select "Access Tokens".
Select "New token".In the pop-up, explain what the token is for.
You can leave it at "read" (the alternative is "write").
Select "create new token".
You can copy the access token.
You can change the API call to include your access token.
from gradio_client import Client

client = Client("eddyS/blip-image-captioning-2",
                hf_token=hf_access_token
               )
result = client.predict(
        "kittens.jpg",
        api_name="/predict"
)
print(result)
# client = Client("abidlabs/whisper-large-v2",
)
Saving your access token securely
- It is suggested that you do not hardcode the access token.
HF_TOKEN="abc1234" # not recommended- You can save your access token to a file called ".env".
HF_ACCESS_TOKEN="abc123"Then access that environment variable with the dotenv library
# !pip install python-dotenv # install library
from dotenv import load_dotenv, find_dotenv
import os
_ = load_dotenv(find_dotenv())
hf_access_token = os.getenv("HF_ACCESS_TOKEN")
GPU Zero Space
ZeroGPU Explorers [https://huggingface.co/zero-gpu-explorers] : A platform for spinning free GPUs on demand for your venues. You can click "request to join this organization". It may take many days or weeks for this to be approved.
Resources
[1] Deeplearningai, (February 2024), Open Source Models with Huggingface:
[https://www.deeplearning.ai/short-courses/open-source-models-hugging-face/]


0 Comments