
https://cbarkinozer.medium.com/pythonun-benzersiz-%C3%B6zellikleri-nelerdir-b%C3%B6l%C3%BCm-4-son-9a5e23641df1
Part 4 of the quirks of the Python series.

Faster Python Code
As we all know, Python is an interpreted programming language. Python applications require an interpreter to transform their code into general machine code. Before a Python module can be executed, its code must be parsed and understood. According to various comparison studies, Python is significantly slower than compiled programming languages such as C++, Java, and C#.
Speeding up Python programs is a critical issue for software engineers today, particularly in machine learning projects with huge datasets and multiple correlated input parameters (features).
The following are the most common tools for speeding up Python programs:
- Cython is a programming language that aims to provide C-like performance with code written primarily in Python, with optional C-inspired syntax. Cython is a compiled language commonly used to create CPython extension modules.
- PyPy is built on the RPython programming language, which compiles Python code into efficient statically typed code. At this point, PyPy transforms the resulting RPython code into bytecode and includes a C-based interpreter. The produced bytecode executes on the compiled code. The package includes a “just-in-time” (JIT) compilation version, which can be used to speed up Python programming. JIT compilation is a method of executing computer code in which code is compiled at runtime rather than before execution.
- Numba is an open-source JIT compiler that converts a chunk of Python and NumPy code into fast machine code during runtime. It is the most popular application for speeding up Python programs nowadays. It was created primarily for scientific computing, utilizing NumPy arrays and functions. Numba can automatically run NumPy array expressions across several CPU cores, making it simple to build parallel loops. The Numba tool provides a variety of options for parallelizing Python programming on CPUs and GPUs with few code changes.
Numba
Let’s look at how Numba’s just-in-time compiler can help you accelerate your program.
import numpy as np
import timeit
from numba import jit

# Define a Python function that calculates the sum of squares
def sum_of_squares(arr):
    result = 0
    for x in arr:
        result += x**2
    return result

# Decorate the function with @jit to compile it with Numba
@jit
def numba_sum_of_squares(arr):
    result = 0
    for x in arr:
        result += x**2
    return result

# Create a large array
arr = np.arange(1000000)

# Time the execution of the Python function
start_time = timeit.default_timer()
sum_of_squares(arr)
end_time = timeit.default_timer()
python_time = end_time - start_time

# Time the execution of the Numba-compiled function
start_time = timeit.default_timer()
numba_sum_of_squares(arr)
end_time = timeit.default_timer()
numba_time = end_time - start_time

print("Python Function Execution Time:", python_time)
print("Numba-compiled Function Execution Time:", numba_time)
Data Visualization
Data visualization is a critical stage in every statistical analysis or machine learning endeavour. Maps or graphs are typically used to illustrate this type of depiction. It aids in the visualization and comprehension of data, allowing for the early detection of patterns, trends, and outliers.
The three most popular data visualization ecosystem libraries in Python are Matplotlib, Seaborn, and Bokeh.
Matplotlib
Matplotlib, the most popular library, offers a wide range of graph types, including scatter plots, bar charts, histograms, line plots, pie charts, stem plots, contour plots, quiver plots, and spectrograms. A Matplotlib figure can be divided into numerous components, as seen below:
- This figure may include one or more axes (plots). A figure can be thought of as a plotted canvas.
- Axes are commonly referred to as plots. A figure can have several axes. It contains items with two or three axes (in 3D). Each axis has a title, x-label, and y-label.
- Axis refers to the number of line-like objects that form the graph’s limits.
- The figure’s elements are all created by artists. Examples include text objects, Line2D objects, and collection objects.
import matplotlib.pyplot as plt
import numpy as np

# Sample data
x = np.random.normal(size=1000)
y = np.random.normal(size=1000)
categories = ['A', 'B', 'C', 'D']
values = [7, 13, 5, 10]
x_line = np.linspace(0, 10, 100)
y_line = np.sin(x_line)

# Create figure and subplots
fig, axes = plt.subplots(2, 3, figsize=(15, 10))

# Histogram
axes[0, 0].hist(x, bins=30, color='skyblue', edgecolor='black')
axes[0, 0].set_title('Histogram')
axes[0, 0].set_xlabel('Value')
axes[0, 0].set_ylabel('Frequency')

# Scatter plot
axes[0, 1].scatter(x, y, alpha=0.5)
axes[0, 1].set_title('Scatter Plot')
axes[0, 1].set_xlabel('X')
axes[0, 1].set_ylabel('Y')

# Horizontal bar chart
axes[0, 2].barh(categories, values, color='lightgreen')
axes[0, 2].set_title('Horizontal Bar Chart')
axes[0, 2].set_xlabel('Values')
axes[0, 2].set_ylabel('Categories')

# Vertical bar chart
axes[1, 0].bar(categories, values, color='lightcoral')
axes[1, 0].set_title('Vertical Bar Chart')
axes[1, 0].set_xlabel('Categories')
axes[1, 0].set_ylabel('Values')

# Line plot
axes[1, 1].plot(x_line, y_line, color='orange')
axes[1, 1].set_title('Line Plot')
axes[1, 1].set_xlabel('X')
axes[1, 1].set_ylabel('Y')

# Remove empty subplot
fig.delaxes(axes[1, 2])

# Adjust layout
plt.tight_layout()

# Show plot
plt.show()
Seaborn
Seaborn library is based on Matplotlib; however, it is a supplement to Matplotlib rather than a replacement. It was designed primarily for statistical data visualization. Seaborn offers the following features for data visualization. Creates themes for styling matplotlib graphics, visualizes univariate and bivariate array data, fits into and visualizes linear and non-linear regression models, excels at plotting statistical time series data, is designed to work well with NumPy and pandas data structures, and provides new themes for styling matplotlib plots, among other things. Seaborn may be installed using the Anaconda Distribution package by running “pip install seaborn” or “conda install seaborn”.
import seaborn as sns
import matplotlib.pyplot as plt

# Load the Iris dataset
iris = sns.load_dataset("iris")

# Set the style for seaborn
sns.set(style="whitegrid")

# Swarm Plot
plt.figure(figsize=(12, 6))
plt.subplot(2, 2, 1)
sns.swarmplot(x="species", y="sepal_length", data=iris)
plt.title("Swarm Plot")

# Factor Plot (using a box plot for this example)
plt.subplot(2, 2, 2)
sns.boxplot(x="species", y="sepal_width", data=iris)
plt.title("Factor Plot (Box Plot)")

# Box Plot
plt.subplot(2, 2, 3)
sns.boxplot(x="species", y="petal_length", data=iris)
plt.title("Box Plot")

# Pair Plot
plt.subplot(2, 2, 4)
sns.pairplot(iris, hue="species", markers=["o", "s", "D"])
plt.title("Pair Plot")

# Adjust layout for better visualization
plt.tight_layout()

# Show the plots
plt.show()
Bokeh
The Bokeh library is designed primarily for web browsers’ interactive data visualizations. This library generates a JSON file, which is used as input by the Bokeh JavaScript library BokehJS. A JSON file contains simple data structures and objects in JavaScript Object Notation (JSON), a common data interchange format. It’s mostly used to send data between a web application and a server. The client-side software BokehJS turns this JSON file into data that can be shown by any common web browser.
from bokeh.plotting import figure, show
from bokeh.io import output_notebook
from bokeh.models import ColumnDataSource
import numpy as np

# Output to notebook
output_notebook()

# Create data
x = np.linspace(0, 4*np.pi, 100)
y_line = np.sin(x)
y_cos = np.cos(x)
categories = ['A', 'B', 'C', 'D']
values = [3, 7, 5, 2]
x_scatter = np.random.rand(50) * 10
y_scatter = np.random.rand(50) * 10

# Line plot
line_plot = figure(title="Line Plot", x_axis_label='x', y_axis_label='sin(x)')
line_plot.line(x, y_line, line_width=2)

# Cosine plot
cos_plot = figure(title="Cosine Plot", x_axis_label='x', y_axis_label='cos(x)')
cos_plot.line(x, y_cos, line_color="red", line_width=2)

# Bar chart
bar_chart = figure(x_range=categories, title="Bar Chart", x_axis_label='Categories', y_axis_label='Values')
bar_chart.vbar(x=categories, top=values, width=0.5)

# Scatter plot
scatter_plot = figure(title="Scatter Plot", x_axis_label='x', y_axis_label='y')
scatter_plot.scatter(x_scatter, y_scatter, size=8, color="navy", alpha=0.5)

# Show plots
show(line_plot)
show(cos_plot)
show(bar_chart)
show(scatter_plot)
Accessing Databases
SQLAlchemy is an open-source SQL toolkit and object-relational mapper (ORM) for Python, licensed under the MIT License. We will show how to do database CRUD (Create, Read, Update, and Delete) activities on the MySQL open-source database. This library is open-source and cross-platform, written entirely in Python. SQLAlchemy utilizes an object-relational mapper (ORM) approach to provide application developers with the full power and flexibility of SQL (structured query language).
In ORM, a programming class object is mapped to a database table (entity), allowing the object model and database schema to form a link. As a result, this relational link enables software engineers to significantly minimize the amount of code required, as well as project development/maintenance time.
PyMySQL driver for MySQL is a Python MySQL client module that complies with the Python Database API specification document PEP 249.
The engine object is the starting point for all SQLAlchemy applications. It is the primary object for the database and its Python Database API Specification (DBAPI), which are delivered to the SQLAlchemy application via a connection pool and a dialect that describes how to communicate with a specific combination of the database and application programming interface (API) functions to be used. Creating an engine requires only one call to the function “create_engine()”.
The connection object serves as the interface between the database engine and the client application that is calling it. It is the object that represents the real DBAPI connection. To build a connection object, use the engine.connect() method. By constructing the connection object, any database CRUD actions can be sent to any supported database engine.
SqlAlchemy CRUD (create, read, update, and delete) examples:
from sqlalchemy import create_engine, Column, Integer, String
from sqlalchemy.ext.declarative import declarative_base
from sqlalchemy.orm import sessionmaker

# Create SQLite database engine
engine = create_engine('sqlite:///books.db', echo=True)

# Create declarative base
Base = declarative_base()

# Define Book model
class Book(Base):
    __tablename__ = 'books'

    id = Column(Integer, primary_key=True)
    title = Column(String)
    author = Column(String)
    genre = Column(String)

    def __repr__(self):
        return f'<Book(title={self.title}, author={self.author}, genre={self.genre})>'

# Create tables
Base.metadata.create_all(engine)

# Create session
Session = sessionmaker(bind=engine)
session = Session()

# Create
book1 = Book(title='To Kill a Mockingbird', author='Harper Lee', genre='Fiction')
book2 = Book(title='1984', author='George Orwell', genre='Science Fiction')
session.add_all([book1, book2])
session.commit()

# Read
all_books = session.query(Book).all()
print("All books:")
for book in all_books:
    print(book)

# Update
book_to_update = session.query(Book).filter_by(title='1984').first()
book_to_update.genre = 'Dystopian Fiction'
session.commit()

# Read after update
updated_book = session.query(Book).filter_by(title='1984').first()
print("Updated book:", updated_book)

# Delete
book_to_delete = session.query(Book).filter_by(title='To Kill a Mockingbird').first()
session.delete(book_to_delete)
session.commit()

# Read after delete
remaining_books = session.query(Book).all()
print("Remaining books:")
for book in remaining_books:
    print(book)

# Close session
session.close()
Python in Production Environment
A VE is a simple utility that helps keep distinct projects’ dependencies separate by generating isolated Python virtual environments. The Python packages (libraries) are deployed in the isolated environment rather than globally. The Anaconda Distribution Package, which is available for Windows, Unix, and MacOS, is one of the most popular VE creation tools. Python packages must be installed in accordance with the Python version selected.
Before releasing any computer programs in production, they must be tested to ensure that any potential defects are eradicated. Python includes a “unittest” framework for unit and integration testing.
Documenting your source code is a must for any program today. Programming comments allow application developers to rapidly grasp the source code for future maintenance and debugging. Python’s code and comment styles are modelled by PEP 8 (Python Enhancement Proposal). Block, inline, and “docstring” comments are ideal for commenting on Python code.
Virtual Environments
Python has its own method of downloading, deploying, and storing packages (libraries). Every Python application has distinct requirements. This means that a single Python installation may be unable to cover the needs of all applications. It is a smart development practice to use virtual environments (VE) to handle several versions of Python and their associated libraries for varied project requirements.
A simple VE may be a self-contained directory tree containing a Python installation for a certain version of Python, as well as the necessary extra libraries. Python includes various VE setup tools, the most common of which is called “venv”. This module offers good support for establishing lightweight VEs with their own site directories that are optionally independent of the system site directories. Each VE has its own Python module files and can have a unique collection of Python packages installed in its site folders.
# Create a new virtual environment named 'myenv'
python3 -m venv myenv

# Activate the virtual environment (on Windows)
myenv\Scripts\activate

# Activate the virtual environment (on Unix or MacOS)
source myenv/bin/activate

deactivate

# Delete the virtual environment directory (on Unix or MacOS)
rm -rf myenv

# Delete the virtual environment directory (on Windows)
rmdir /s myenv
Structure of the built virtual environment:
- Include a folder with any relevant modules.
- The Lib folder contains a site-packages folder with Python libraries and packages dependent on the chosen Python version.
- Scripts include Python-related exe files, as well as bat files for activating and deactivating them.
- The pyvenv.cfg file specifies the Python VM’s main install directory, version, and other settings.
Dependency Management
Python’s dependencies are managed using the following two libraries (packages):
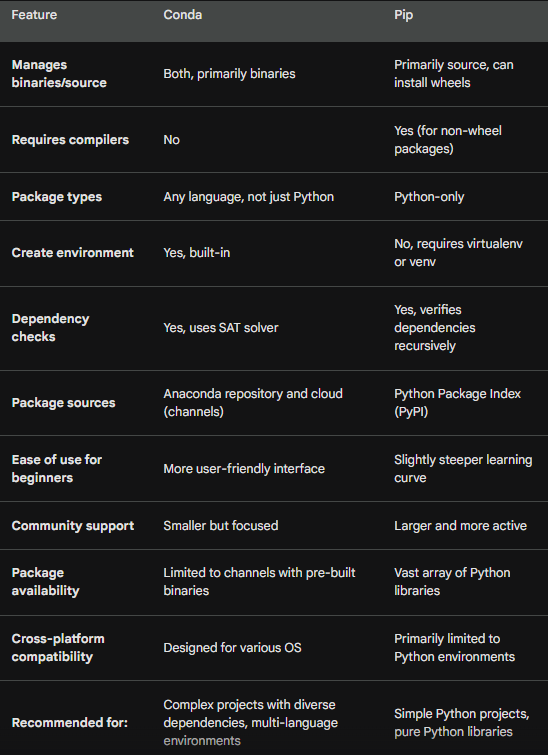
- Pip is the preferred Python installation software for installing programs from the Python Package Index (PyPI). This package serves as a public repository for Python-related software. It makes it easier to find and install applications created and shared by the Python community.
- The main package, conda, can be used with command line commands in Anaconda Prompt for Windows or terminal window for macOS or Linux (McKinney, 2017).
It is advised that you use “conda” initially when setting up Python VE. If conda cannot find the required package to install, use “pip” as a second option. Both packages’ commands are intelligent enough to check dependency on the appropriate package version for the Python version installed.
Conda vs Pip
The following table compares conda and pip.
Unit and Integration Testing
Software testing is now an essential component of any computer program’s development life cycle. Software quality assurance (QA) engineers focus on software testing. The most popular functional testing programs used by software engineers nowadays are as follows:
- Unit tests ensure software functionality and assist in identifying and resolving issues quickly.
- Integration tests evaluate a program’s various functions and their interactions. It also assists you in identifying as many broken functionality as feasible in your application by testing it as a whole. In general, these tests take more time than unit tests.
We’ll go over some important software testing rules below.
- Start with a simple unit test. This code is often written in function procedures found in a module or a class file.
- Make sure each unit test is completely independent. Each test must be capable of running both alone and as part of the entire test suite, regardless of the sequence in which they are called.
- Try to run your unit tests fast so that development time does not grow.
- Run your function’s tests frequently, preferably when you save the code.
- Always run the entire test suite before and after each coding session. This ensures that you have not broken anything in the remaining code.
- Before submitting code to a shared repository, perform a session that includes all case tests.
- If you need to pause your development session for any reason, it is a good idea to write a broken unit test for what you intend to produce next. It will assist you to remember where you are when you return to the software.
- If you discover a bug in your application, develop a new test to pinpoint the problem. This test will be part of your final program evaluation.
- Provide the proper names for your functions based on their implementation.
- End your software testing with a variety of integration tests. Ensure that they are adequately planned and documented.
Unittest — Unit Testing Framework
The “unittest” framework is the most widely used in Python application development nowadays. According to its documentation, it provides test automation, setup and shutdown code sharing, collection aggregation, and test independence from the reporting framework.
We’ll now look at the following unit test cases:
import unittest
class AddressBook:
def __init__(self):
self.contacts = {}
def add_contact(self, name, email):
self.contacts[name] = email
def remove_contact(self, name):
if name in self.contacts:
del self.contacts[name]
def search_contact(self, name):
return self.contacts.get(name, None)
class TestAddressBook(unittest.TestCase):
def setUp(self):
self.address_book = AddressBook()
self.address_book.add_contact("Alice", "alice@example.com")
self.address_book.add_contact("Bob", "bob@example.com")
def test_add_contact(self):
self.address_book.add_contact("Charlie", "charlie@example.com")
self.assertIn("Charlie", self.address_book.contacts)
self.assertEqual(self.address_book.contacts["Charlie"], "charlie@example.com")
def test_remove_contact(self):
self.address_book.remove_contact("Alice")
self.assertNotIn("Alice", self.address_book.contacts)
def test_search_contact(self):
self.assertEqual(self.address_book.search_contact("Alice"), "alice@example.com")
self.assertEqual(self.address_book.search_contact("Bob"), "bob@example.com")
self.assertIsNone(self.address_book.search_contact("Charlie"))
if __name__ == '__main__':
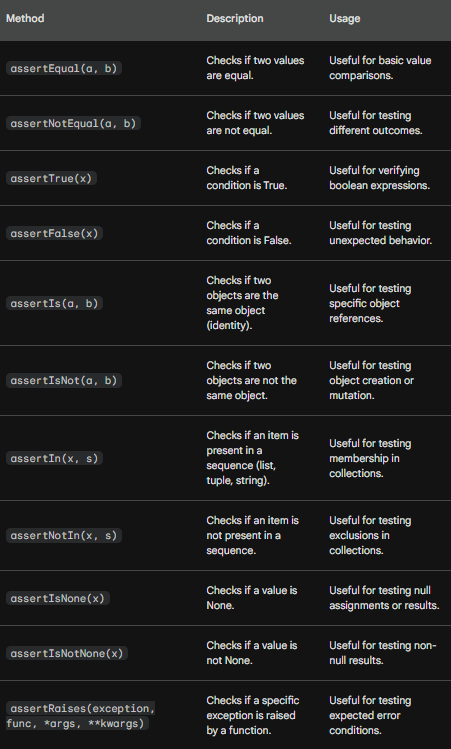
unittest.main()assertIn(), assertNotIn(), assertEqual(), and assertIsNone() are methods defined in the unittest method that determines whether test cases pass.
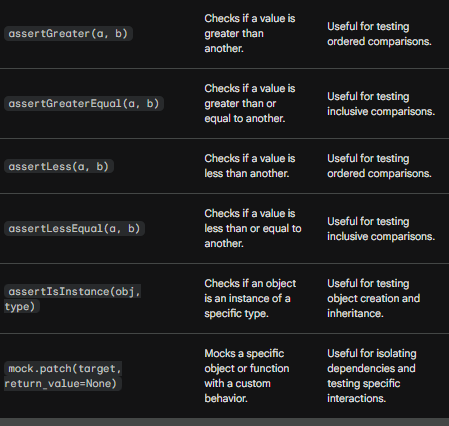
Other commonly used methods in unit testing:
Documenting Code
A programming comment is an explanation or annotation in source code that can be read by a programmer. They are introduced to make the source code easier for engineers to grasp. Compilers and interpreters for programming languages ignore these comments.
The main goal of programming comments is to enable application developers to quickly grasp the source code for future maintenance and debugging. Comments allow other programmers to read through your code and understand how everything works depending on the program requirements. You can ensure a smooth program transition by commenting on your code from the beginning of a project. If a bug is discovered in a certain line of code, we can use the comment to figure out what went wrong and correct the code.
The Python programming language has a style guide that governs the composition of code and comments. It follows the Python Enhancement Proposal (PEP) standards. The PEP is a design document that informs the Python community, specifies a new Python feature, or explains Python’s methods and environment. The PEP should include a brief technical specification and a rationale for the feature.
The PEP 8-Style Guide for Python Code document specifies coding guidelines for the standard library in the Python distribution. This document includes a “comment” subject that specifies its best practices. Here are a few examples:
- When the code is updated, make sure the comments are up to date first.
- Comments should be entire, unambiguous sentences, not simply a collection of words.
- Block comments typically consist of one or more lines constructed from complete sentences.
- In multi-sentence comments, use two spaces after a sentence-ending period, except for the final sentence.
- Write your comments in English unless you are certain that the code will be read by non-English speakers.
PEP 257 defines “docstrings” as a type of remark. A docstring is a string literal that appears as the first statement in a module, function, class, or method definition. Non-public methods do not require “docstrings” comments, but they should include a broad description of what they perform. Generally, this comment should come after the “def” line. It supports three single quotes ‘’’ and three double quotes ‘’’’’’.
class Person:
    """A class to represent a person.

    Attributes:
    name (str): The name of the person.
    age (int): The age of the person.
    profession (str): The profession of the person.
    """

    def __init__(self, name, age, profession):
        """Initialize a Person object with name, age, and profession."""
        self.name = name
        self.age = age
        self.profession = profession

    def greet(self):
        """Return a greeting message."""
        return f"Hello, my name is {self.name} and I am {self.age} years old."

    def work(self):
        """Return a message describing the person's profession."""
        return f"I work as a {self.profession}."


0 Comments